D-Link DSN-4200 Hardware Reference Guide for DSN-4000 - Page 36
A-6. Diagnostic Serial Port on Array Rear Panel, A-7. Administrative Menu from
 |
View all D-Link DSN-4200 manuals
Add to My Manuals
Save this manual to your list of manuals |
Page 36 highlights
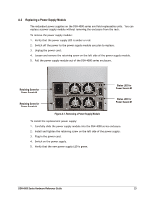
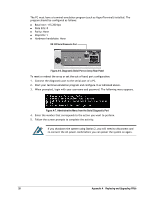
The PC must have a terminal-emulation program (such as HyperTerminal) installed. The program should be configured as follows: Baud rate: 115,200 bps Data bits: 8 Parity: None Stop bits: 1 Hardware handshake: None RS-232 Serial Diagnostic Port Figure A-6. Diagnostic Serial Port on Array Rear Panel To reset or reboot the array or set the out-of-band port configuration: 1. Connect the diagnostic port to the serial port of a PC. 2. Start your terminal-emulation program and configure it as indicated above. 3. When prompted, login with your username and password. The following menu appears. Figure A-7. Administrative Menu from the Serial Diagnostic Port 4. Enter the number that corresponds to the action you want to perform. 5. Follow the screen prompts to complete the activity. If you shutdown the system using Option 2, you will need to disconnect and re-connect the AC power cords before you can power the system on again. 28 Appendix A Replacing and Upgrading FRUs
-
 1
1 -
2
-
3
-
4
-
5
-
6
-
7
-
8
-
9
-
10
-
11
-
12
-
13
-
14
-
15
-
16
-
17
-
18
-
19
-
20
-
21
-
22
-
23
-
24
-
25
-
26
-
27
-
28
-
29
-
30
-
 31
31 -
 32
32 -
 33
33 -
 34
34 -
 35
35 -
 36
36 -
 37
37 -
 38
38
 |
 |
