Dell E6500 Service Manual - Page 50
Right-Speaker and Fingerprint Reader Cover
 |
UPC - 884116029793
View all Dell E6500 manuals
Add to My Manuals
Save this manual to your list of manuals |
Page 50 highlights
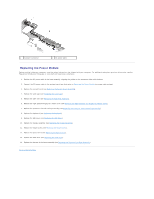
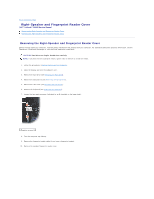
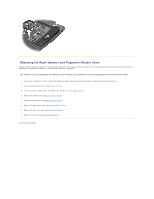
Back to Contents Page Right-Speaker and Fingerprint Reader Cover Dell™ Latitude™ E6500 Service Manual Removing the Right-Speaker and Fingerprint Reader Cover Replacing the Right-Speaker and Fingerprint Reader Cover Removing the Right-Speaker and Fingerprint Reader Cover Before working inside your computer, read the safety information that shipped with your computer. For additional safety best practices information, see the Regulatory Compliance Homepage at: www.dell.com/regulatory_compliance. CAUTION: Hard drives are fragile. Handle them carefully. NOTE: If you don't have a fingerprint reader, ignore steps to remove or install the reader. 1. Follow the procedures in Before Working on Your Computer. 2. Close the display and turn the computer over. 3. Remove the hard drive (see Removing the Hard Drive). 4. Remove the optical drive (see Removing the Optical Drive). 5. Remove the LED cover (see Removing the LED Cover). 6. Remove the keyboard (see Removing the Keyboard). 7. Loosen the two captive screws (indicated by an S stenciled on the base plate). 1 captive screws (2) 8. Turn the computer top-side up. 9. Remove the fingerprint reader cable (if you have a fingerprint reader). 10. Remove the speaker/fingerprint reader cover.
-
 1
1 -
2
-
3
-
4
-
5
-
6
-
7
-
8
-
9
-
10
-
11
-
12
-
13
-
14
-
15
-
16
-
17
-
18
-
19
-
20
-
21
-
22
-
23
-
24
-
25
-
26
-
27
-
28
-
29
-
30
-
31
-
32
-
33
-
34
-
35
-
36
-
37
-
38
-
39
-
40
-
41
-
42
-
43
-
44
-
 45
45 -
 46
46 -
 47
47 -
 48
48 -
 49
49 -
 50
50 -
 51
51 -
 52
52 -
 53
53 -
 54
54 -
 55
55 -
56
-
57
-
58
-
59
-
60
-
61
-
62
-
63
-
64
-
65
-
66
-
67
-
68
-
69
-
70
-
71
-
72
 |
 |
