Dell PowerConnect W-AP175 Dell PowerConnect W-AP175P Installation Guide - Page 26
Connecting the Power Cable (W-AP175 AC/DC), Cable Connection Steps,
 |
View all Dell PowerConnect W-AP175 manuals
Add to My Manuals
Save this manual to your list of manuals |
Page 26 highlights
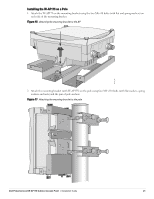
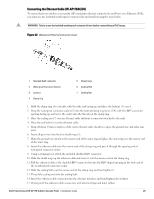
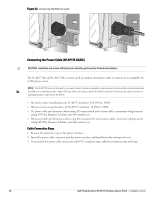
Figure 23 Connecting the Ethernet cable Connecting the Power Cable (W-AP175 AC/DC) CAUTION: Installation and service of Dell products should be performed by Professional Installers. The W-AP175AC and W-AP175DC versions need an outdoor rated power cable to connect to a compatible AC or DC power source. NOTE: The W-AP175 does not ship with any power cables; these are available as accessories and should be ordered separately. In addition to completed power cables, Dell also offers an outdoor rated AC and DC connector kit that can be used to connect a compatible power cable to the W-AP175. AC power source specifications (at W-AP175 interface): 100-240Vac, 100W DC power source specifications (at W-AP175 interface): 12-48Vdc, 100W AC power cable specifications (when using AC connector kit and custom cable): minimum voltage/current rating 250V/1A, diameter 6-12mm, rated for outdoor use DC power cable specifications (when using DC connector kit and custom cable): minimum voltage/current rating 60V/10A, diameter 6-12mm, rated for outdoor use Cable Connection Steps 1. Remove the protective cap on the power interface. 2. Insert the power cable connector into the power interface and hand-fasten the waterproof cover. 3. Water-proof the power cable connection with PVC insulation tape, adhesive insulation tape and strap. 26 Dell PowerConnect W-AP175 Outdoor Access Point | Installation Guide
-
 1
1 -
2
-
3
-
4
-
5
-
6
-
7
-
8
-
9
-
10
-
11
-
12
-
13
-
14
-
15
-
16
-
17
-
18
-
19
-
20
-
 21
21 -
 22
22 -
 23
23 -
 24
24 -
 25
25 -
 26
26 -
 27
27 -
 28
28 -
 29
29 -
 30
30 -
 31
31 -
32
 |
 |
