Dell Venue Dell Mobile Sync Manual - Page 45
Auto Enhance, Enhance, Modify, Red Eye Removal, Skip back/Skip to, next track, Apply
 |
View all Dell Venue manuals
Add to My Manuals
Save this manual to your list of manuals |
Page 45 highlights
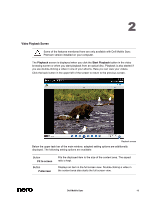
2 The following setting options are available on the lower task bar: Button Auto Enhance Improves the quality automatically based on terms of reference. The same function is available via the Auto Enhance button on the Enhance tab in the Modify window. Button Red Eye Removal Opens the Red Eye Removal window. The mouse pointer changes into a cross. Simply keep the left mouse button pressed to define a rectangle around the affected area on your photo. Release the mouse button to apply the effect. Red eyes are removed automatically. Button Skip back/Skip to next track Skips to the previous/next item. In contrast to the thumbnail strip that only shows the photos of a selection or group, you can use the skip buttons to display the items of previous/next stacks. Button Play Starts playback of an instant slide show. The instant slide show is presented with default transitions and default background music. To avoid conflicts, any ongoing background music is suspended and the instant slide show's own music is played. Slide shows are played in full screen view. The instant slide show plays all the photos in the selected album or photo browsing screen. You can preselect the photos and movies you want to play back in your instant slide show. Select the check box displayed in the upper left corner to select the item. Not available for photos belonging to slide show compilations. Button Modify Opens the Modify window in which you can choose from several effects, adjustments and enhancements presented on three correspondent tabs. Button Crop Opens the Crop window in which you can choose from several templates that are defining the aspect ratio of a crop frame. You can also change the size of your item manually. To crop manually, move the mouse pointer from the Crop window to the content area. It changes into a cropping tool. Click, hold, and move the cropping tool to directly see which part of the photo will be cropped. The width, height and position of the cropped area can be adjusted after the cropping tool has been released. Once you are happy with the defined size, click the Apply button to cut down the item. Dell Mobile Sync 45
-
 1
1 -
2
-
3
-
4
-
5
-
6
-
7
-
8
-
9
-
10
-
11
-
12
-
13
-
14
-
15
-
16
-
17
-
18
-
19
-
20
-
21
-
22
-
23
-
24
-
25
-
26
-
27
-
28
-
29
-
30
-
31
-
32
-
33
-
34
-
35
-
36
-
37
-
38
-
39
-
 40
40 -
 41
41 -
 42
42 -
 43
43 -
 44
44 -
 45
45 -
 46
46 -
 47
47 -
 48
48 -
 49
49 -
 50
50 -
51
-
52
-
53
-
54
-
55
-
56
-
57
-
58
-
59
-
60
-
61
-
62
-
63
-
64
-
65
-
66
-
67
-
68
-
69
-
70
-
71
-
72
-
73
-
74
-
75
 |
 |
