Dell Venue Dell Mobile Sync Manual - Page 73
Upload, Nero Community Upload, Login, See also
 |
View all Dell Venue manuals
Add to My Manuals
Save this manual to your list of manuals |
Page 73 highlights
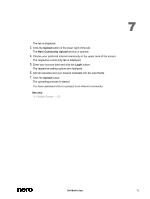
7 The tab is displayed. 3. Click the Upload button in the lower right of the tab. The Nero Community Upload window is opened. 4. Choose your preferred Internet community in the upper area of the screen. The respective community tab is displayed. 5. Enter your account data and click the Login button. The respective setting options are displayed. 6. Add all expected and your desired metadata into the input fields. 7. Click the Upload button. The uploading process is started. You have uploaded a file or a project to an Internet community. See also Publish Screen → 55 Dell Mobile Sync 73
-
 1
1 -
2
-
3
-
4
-
5
-
6
-
7
-
8
-
9
-
10
-
11
-
12
-
13
-
14
-
15
-
16
-
17
-
18
-
19
-
20
-
21
-
22
-
23
-
24
-
25
-
26
-
27
-
28
-
29
-
30
-
31
-
32
-
33
-
34
-
35
-
36
-
37
-
38
-
39
-
40
-
41
-
42
-
43
-
44
-
45
-
46
-
47
-
48
-
49
-
50
-
51
-
52
-
53
-
54
-
55
-
56
-
57
-
58
-
59
-
60
-
61
-
62
-
63
-
64
-
65
-
66
-
67
-
 68
68 -
 69
69 -
 70
70 -
 71
71 -
 72
72 -
 73
73 -
 74
74 -
 75
75
 |
 |

7
Dell Mobile Sync
73
The tab is displayed.
3.
Click the
Upload
button in the lower right of the tab.
The
Nero Community Upload
window is opened.
4.
Choose your preferred Internet community in the upper area of the screen.
The respective community tab is displayed.
5.
Enter your account data and click the
Login
button.
The respective setting options are displayed.
6.
Add all expected and your desired metadata into the input fields.
7.
Click the
Upload
button.
The uploading process is started.
You have uploaded a file or a project to an Internet community.
See also
Publish Screen
→
55