Dell Venue Dell Mobile Sync Manual - Page 55
Publish Screen
 |
View all Dell Venue manuals
Add to My Manuals
Save this manual to your list of manuals |
Page 55 highlights
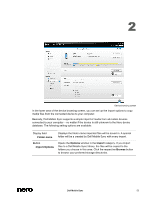
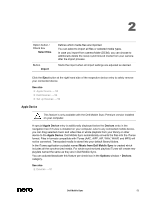
2 Device Setup wizard window. This assistant guides you through an easy setup to make your device work. You can also change settings of your set up device here. For each set up device, default folders for music, photos and videos are displayed below the main [Device name] entry. A click on one of the default folder entries shows the media content available in the respective device folder. The main device browsing screen remains split: The upper area shows the name and information about free and total capacity of your device. In addition, the device memory occupied by the different media types is illustrated on a colored capacity bar. In the lower area of the device browsing screen, you can set up the import options to copy media files from the connected device to your computer. The Import area is available for any connected device. See also Devices → 51 Setting Up Device → 67 Publish Screen Some of the features mentioned here are only available with Dell Mobile Sync Premium version installed on your computer. Clicking the publishing button in one of the browsing screens displays the Publish screen. The Publish screen is split in two areas: The upper area shows the content of your compilation. In the lower area of the screen different ways to publish the project content are offered. You can choose the required options on the selected tab. Finally, clicking the Burn or the Upload button in the lower right of the tab starts the publishing or uploading process. A status bar is displayed to show the progress. Switching to another screen will not stop the process. A small status bar in the lower left corner of the main window stays visible and lets you track the progress. You can click this display to return to the Publish screen. Dell Mobile Sync 55
-
 1
1 -
2
-
3
-
4
-
5
-
6
-
7
-
8
-
9
-
10
-
11
-
12
-
13
-
14
-
15
-
16
-
17
-
18
-
19
-
20
-
21
-
22
-
23
-
24
-
25
-
26
-
27
-
28
-
29
-
30
-
31
-
32
-
33
-
34
-
35
-
36
-
37
-
38
-
39
-
40
-
41
-
42
-
43
-
44
-
45
-
46
-
47
-
48
-
49
-
 50
50 -
 51
51 -
 52
52 -
 53
53 -
 54
54 -
 55
55 -
 56
56 -
 57
57 -
 58
58 -
 59
59 -
 60
60 -
61
-
62
-
63
-
64
-
65
-
66
-
67
-
68
-
69
-
70
-
71
-
72
-
73
-
74
-
75
 |
 |
