Dell XPS 630i Service Manual - Page 41
Install the PCI Express graphics card see Installing PCI and PCI Express, Owner's Manual - upgrade
 |
View all Dell XPS 630i manuals
Add to My Manuals
Save this manual to your list of manuals |
Page 41 highlights
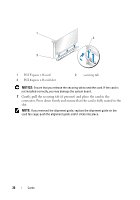
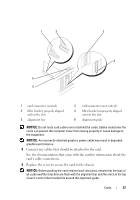
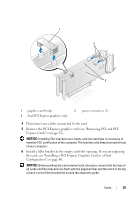
To learn more about dual-graphics technology, see "Understanding Dual Graphics Technology" in your Owner's Manual. 1 Follow the procedures in "Before You Begin" on page 9. 2 Remove the computer cover (see "Removing the Computer Cover" on page 13). 3 Remove the filler bracket or existing graphics card (see "Removing a PCI Express Graphics Card From a Dual Configuration" on page 38) to create a card-slot opening. NOTE: If you are upgrading to a dual-graphics card configuration and have a card installed in the PCI Express x1 card slot, remove the card (see "Removing PCI and PCI Express Cards" on page 32). 4 Install the PCI Express graphics card (see "Installing PCI and PCI Express Cards" on page 35). 5 Prepare the card for installation. See the documentation that came with the card for information on configuring the card, making internal connections, or otherwise customizing it for your computer. NOTICE: An incorrectly attached graphics power cable may result in degraded graphics performance. 6 Connect any cables that should be attached to the card. See the documentation that came with the card for information about the card's cable connections. NOTICE: Before pushing the card retainer back into place, ensure that the tops of all cards and filler brackets are flush with the alignment bar and the notch in the top of each card or filler bracket fits around the alignment guide. 7 Rotate the card retainer back into its original position; push its tip so that its tab clicks into place. 8 Attach the graphics card bridge (if required for your dual-graphics configuration), pressing firmly so that it completely covers the connector tabs. Cards 41
-
 1
1 -
2
-
3
-
4
-
5
-
6
-
7
-
8
-
9
-
10
-
11
-
12
-
13
-
14
-
15
-
16
-
17
-
18
-
19
-
20
-
21
-
22
-
23
-
24
-
25
-
26
-
27
-
28
-
29
-
30
-
31
-
32
-
33
-
34
-
35
-
 36
36 -
 37
37 -
 38
38 -
 39
39 -
 40
40 -
 41
41 -
 42
42 -
 43
43 -
 44
44 -
 45
45 -
 46
46 -
47
-
48
-
49
-
50
-
51
-
52
-
53
-
54
-
55
-
56
-
57
-
58
-
59
-
60
-
61
-
62
-
63
-
64
-
65
-
66
-
67
-
68
-
69
-
70
-
71
-
72
-
73
-
74
-
75
-
76
-
77
-
78
-
79
-
80
-
81
-
82
-
83
-
84
-
85
-
86
-
87
-
88
-
89
-
90
-
91
-
92
-
93
-
94
-
95
-
96
-
97
-
98
-
99
-
100
-
101
-
102
-
103
-
104
-
105
-
106
-
107
-
108
-
109
-
110
-
111
-
112
-
113
-
114
-
115
-
116
-
117
-
118
-
119
-
120
 |
 |
