Dell XPS 630i Service Manual - Page 92
Installing the Power Supply
 |
View all Dell XPS 630i manuals
Add to My Manuals
Save this manual to your list of manuals |
Page 92 highlights
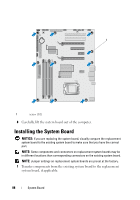
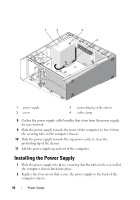
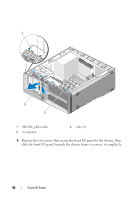
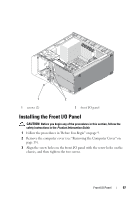
1 2 3 4 1 power supply 3 screw 2 protruding lip of the chassis 4 cable clamp 8 Gather the power supply cable bundles that stem from the power supply, for easy removal. 9 Slide the power supply towards the front of the computer, to free it from the securing tabs on the computer chassis. 10 Slide the power supply towards the expansion cards, to clear the protruding lip of the chassis. 11 Lift the power supply up and out of the computer. Installing the Power Supply 1 Slide the power supply into place, ensuring that the tabs on the rear wall of the computer chassis latch into place. 2 Replace the four screws that secure the power supply to the back of the computer chassis. 92 Power Supply
-
 1
1 -
2
-
3
-
4
-
5
-
6
-
7
-
8
-
9
-
10
-
11
-
12
-
13
-
14
-
15
-
16
-
17
-
18
-
19
-
20
-
21
-
22
-
23
-
24
-
25
-
26
-
27
-
28
-
29
-
30
-
31
-
32
-
33
-
34
-
35
-
36
-
37
-
38
-
39
-
40
-
41
-
42
-
43
-
44
-
45
-
46
-
47
-
48
-
49
-
50
-
51
-
52
-
53
-
54
-
55
-
56
-
57
-
58
-
59
-
60
-
61
-
62
-
63
-
64
-
65
-
66
-
67
-
68
-
69
-
70
-
71
-
72
-
73
-
74
-
75
-
76
-
77
-
78
-
79
-
80
-
81
-
82
-
83
-
84
-
85
-
86
-
 87
87 -
 88
88 -
 89
89 -
 90
90 -
 91
91 -
 92
92 -
 93
93 -
 94
94 -
 95
95 -
 96
96 -
 97
97 -
98
-
99
-
100
-
101
-
102
-
103
-
104
-
105
-
106
-
107
-
108
-
109
-
110
-
111
-
112
-
113
-
114
-
115
-
116
-
117
-
118
-
119
-
120
 |
 |

92
Power Supply
8
Gather the power supply cable bundles that stem from the power supply,
for easy removal.
9
Slide the power supply towards the front of the computer, to free it from
the securing tabs on the computer chassis.
10
Slide the power supply towards the expansion cards, to clear the
protruding lip of the chassis.
11
Lift the power supply up and out of the computer.
Installing the Power Supply
1
Slide the power supply into place, ensuring that the tabs on the rear wall of
the computer chassis latch into place.
2
Replace the four screws that secure the power supply to the back of the
computer chassis.
1
power supply
2
protruding lip of the chassis
3
screw
4
cable clamp
1
2
3
4