Dymo Rhino 6000 Industrial Label Printer User Guide
Dymo Rhino 6000 Industrial Label Printer Manual
 |
View all Dymo Rhino 6000 Industrial Label Printer manuals
Add to My Manuals
Save this manual to your list of manuals |
Dymo Rhino 6000 Industrial Label Printer manual content summary:
- Dymo Rhino 6000 Industrial Label Printer | User Guide - Page 1
User Guide Rhino 6000 - Dymo Rhino 6000 Industrial Label Printer | User Guide - Page 2
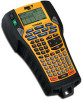
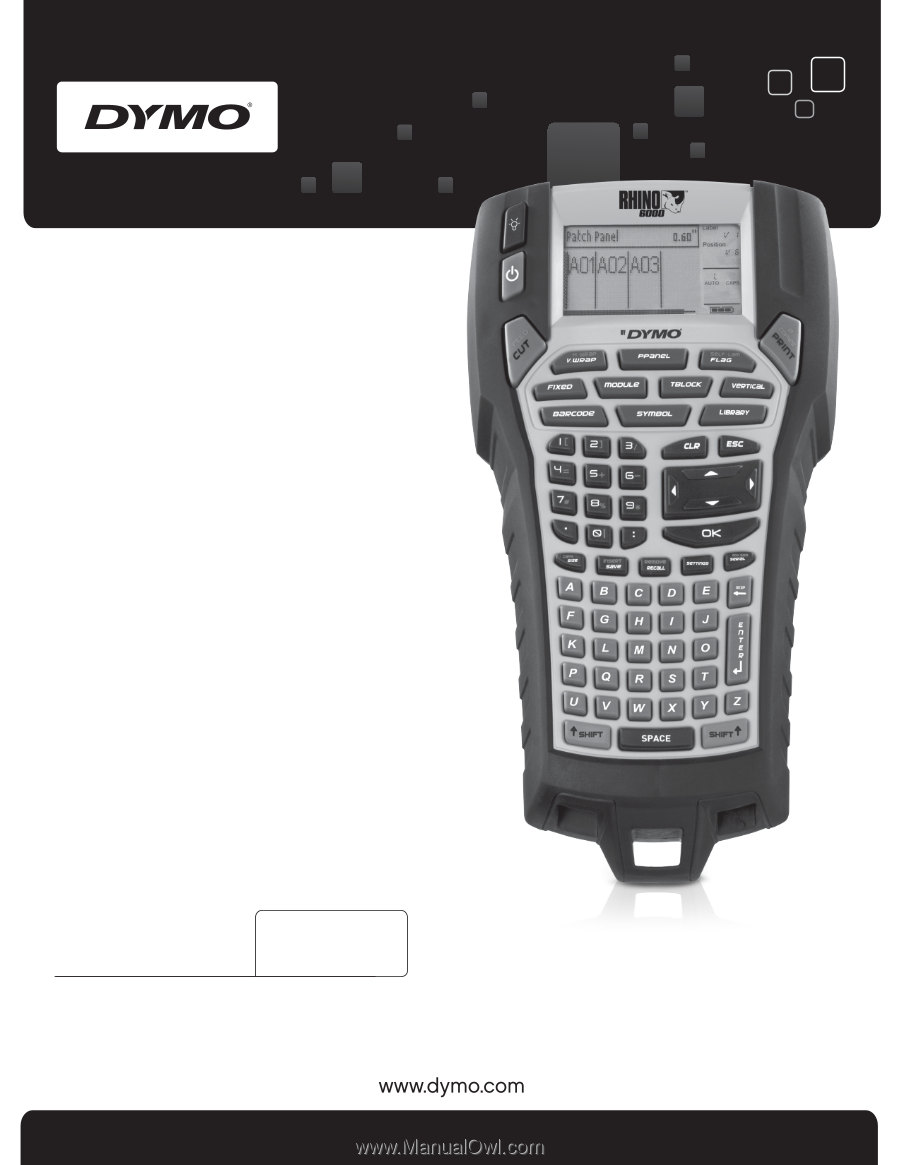
Tape Exit Backlight Power Cut/Feed Hot Keys Barcode Symbol Size/CAPS Save/Insert Recall/Remove LCD display Print/# of copies Library Escape Clear Navigation keys OK Serialization Settings Backspace Enter Shift USB connector Space bar Power connector Figure 1 RHINO 6000 LabelPrinter - Dymo Rhino 6000 Industrial Label Printer | User Guide - Page 3
Selecting a Language 2 Selecting Units of Measure 3 Getting to Know Your Printer 3 Power 3 LCD Display 3 Using the Backlight 3 Adjusting the Label Files 5 Creating a Label File 5 Adding Labels to a Label File 5 Removing Labels from a File 5 Printing a Label File 5 Formatting a Label - Dymo Rhino 6000 Industrial Label Printer | User Guide - Page 4
Industrial Labels 6 Creating Wire Wrap Labels 7 Creating Vertical Wrap Labels 7 Creating Horizontal Wrap Labels 7 Creating Self-Laminating Labels 7 Creating Flag Labels 7 Creating Fixed Length Labels 8 Creating Patch Panel Labels 8 Creating Terminal Block Labels 8 Creating Module Labels - Dymo Rhino 6000 Industrial Label Printer | User Guide - Page 5
14 Using Printer Memory 15 Saving a Label File 15 Recalling a Label File from Memory 15 Deleting a Label File from Memory 15 Cleaning Your Printer 15 Using RHINO Connect Software 16 Connecting to your Computer 16 Symbols 17 Library Text 18 Troubleshooting 20 Contacting Customer Support 25 - Dymo Rhino 6000 Industrial Label Printer | User Guide - Page 6
- Dymo Rhino 6000 Industrial Label Printer | User Guide - Page 7
styles. The printer uses RHINO Industrial label tape cassettes in widths of 6 mm, 9 mm, 12 mm, 19 mm, or 24 mm. RHINO tape cassettes are also available in a wide range of materials, such as flexible nylon, permanent polyester, vinyl, non-adhesive tag, and heat shrink tubes. Visit www.dymo.com for - Dymo Rhino 6000 Industrial Label Printer | User Guide - Page 8
. Visit www.dymo.com for information about purchasing additional tape cassettes. To insert the tape cassette 1. Gently lift the tape cassette door on the back of the printer. 2. Make sure the tape and ribbon are taut across the mouth of the cassette and that the tape passes between the guides. If - Dymo Rhino 6000 Industrial Label Printer | User Guide - Page 9
off. If no keys are pressed after five minutes, the power is turned off automatically. When the printer is turned off, the current label file and its settings are remembered for the next time the printer is turned on. If the battery pack and power adapter are disconnected at the same time, some - Dymo Rhino 6000 Industrial Label Printer | User Guide - Page 10
Cutter Button The Cutter button cuts the label tape. When printing multiple labels, the printer pauses after printing each label so that you can cut the label. You can turn this feature off, so that multiple labels will print continuously. See Pausing between Labels on page 14. Hot Keys A number of - Dymo Rhino 6000 Industrial Label Printer | User Guide - Page 11
and stores labels as label files. A label file can contain one or more labels. When you create a new label, you also create a new label file. You can then insert additional labels, remove labels, and store the group of labels as a label file in memory. Creating a Label File The printer remembers the - Dymo Rhino 6000 Industrial Label Printer | User Guide - Page 12
label 1. Type the text for the first line, and press ENTER. 2. Type the text for the next line. 3. Repeat these steps for each additional line. Using International Characters The printer supports use. Creating Industrial Labels You can quickly create labels for special industrial applications, such - Dymo Rhino 6000 Industrial Label Printer | User Guide - Page 13
Done (ESC) to create the label. To create multiple labels quickly, see Creating a Series of Labels on page 12. Creating Self-Laminating Labels The Self-Laminating label is designed to be used with RHINO Self-Laminating Labels (part number 1734821). The text of the label is printed on the top portion - Dymo Rhino 6000 Industrial Label Printer | User Guide - Page 14
size and press OK. 5. Enter the width of each block and press OK. The factory default is 17.5 mm. 6. Select Done (ESC) to create the label. 7. Enter the text for each terminal. Use SHIFT + , or = to move among terminals. To create data for the terminal blocks automatically, see Creating a Series of - Dymo Rhino 6000 Industrial Label Printer | User Guide - Page 15
the desired text for each fuse, and print. The result is a long label with multiple, evenly spaced text for each port. You can use fuse multipliers to adjust the width of individual modules as necessary. To create a module label 1. Press MODULE. 2. Select Fuse length and press OK. 3. Enter the - Dymo Rhino 6000 Industrial Label Printer | User Guide - Page 16
select Done (ESC). A vertical mark is printed between each cell. Using Barcodes The printer can generate the following types of barcodes. Code 39 EAN 8 Code 128 Auto the barcode. Adding a Barcode The barcode text appears on the label in the display just like any other text. However, if the - Dymo Rhino 6000 Industrial Label Printer | User Guide - Page 17
If you transfer a custom set of symbols from the RHINO Connect™ Software to the printer, an additional set of User symbols becomes available. See Using RHINO Connect Software on page 16 for more information. Inserting Symbols Symbols added to a label can be formatted or deleted just like any other - Dymo Rhino 6000 Industrial Label Printer | User Guide - Page 18
that letter. 4. Press OK to insert the text on the label. Adding My Library Text You can download custom text from RHINO Connect Software or you can add custom text to the library directly from the printer. See Using RHINO Connect Software on page 16 for more information. To add custom text 1. Press - Dymo Rhino 6000 Industrial Label Printer | User Guide - Page 19
OK. 6. Select the amount you want to increment these characters on each label and press OK. You can choose to increment in steps up to 10 C-102, C-103, and so on. To use advanced serialization 1. Enter the text for your label. 2. Press ADV.SER. (SHIFT + SERIAL). 3. Select Advanced and press OK. A box - Dymo Rhino 6000 Industrial Label Printer | User Guide - Page 20
On. 4. Press OK and then select Done (ESC). Pausing between Labels By default the printer pauses after printing each label so you can cut the label. You can turn this feature off to have the labels print continuously. To set the printer to print continuously 1. Press SETTINGS. 2. Select Pause to cut - Dymo Rhino 6000 Industrial Label Printer | User Guide - Page 21
Use the arrow keys to move to the label file you wish to delete. 3. Press and then press OK to clear the memory location. Cleaning Your Printer Your printer is designed to give you long and troublefree service, while requiring very little maintenance. Clean your printer from time to time to keep it - Dymo Rhino 6000 Industrial Label Printer | User Guide - Page 22
-step wizard • Print labels directly from RHINO Connect Software Visit www.dymo.com for more information about obtaining the software. In addition, you can download a free Windows printer driver so you can print directly to your RHINO printer from any Windows application. Connecting to your Computer - Dymo Rhino 6000 Industrial Label Printer | User Guide - Page 23
Symbols The following tables list the default symbols by category. Electrical Brackets Voice/Data Audio/Video ( ) [ ] { } Arrows ←↑→↓ Numbers ½ ¼ ¾ Currency Warning Punctuation 17 - Dymo Rhino 6000 Industrial Label Printer | User Guide - Page 24
MASTER BEDROOM MEDIA ROOM OFFICE OUTSIDE PATIO PLAY ROOM POOL PORCH RIGHT SITTING ROOM SPA STUDY SUNROOM THEATER UPPER UTILITY ROOM YARD Audio ANALOG AUDIO CD CENT FRONT SPKR CENTER BACKSPKR DIGITAL LEFT BACK SPKR LEFT FRONT SPKR LEFT OUTD SPKR LEFT SIDE SPKR LEFT SURR. SPKR OPTICAL Video CATV - Dymo Rhino 6000 Industrial Label Printer | User Guide - Page 25
Voice/ Data CO CABLE MODEM DSL DSLAM DEMARC DESKTOP FAX INTERNET Security BACK DOOR CCTV CAMERA CARBON MONOXIDE CELL CONTACT CONTROLLER DOOR DOOR CONTACT DRIVEWAY DUAL TECH DUCT FAN CUTOFF FRONT DOOR GARAGE DOOR GAS GATE GLASS BREAK GROUND LAN LAPTOP NETWORK PHONE PHONE SYSTEM USB VoIP WIRELESS - Dymo Rhino 6000 Industrial Label Printer | User Guide - Page 26
Troubleshooting Review the following possible solutions if you encounter a problem while using your printer. Problem/Error Message Solution to return to return to the display and clear all settings. • Ensure the printer is turned on. • Recharge battery pack or plug in power adapter. • Remove power - Dymo Rhino 6000 Industrial Label Printer | User Guide - Page 27
Problem/ tape. • Change the tape width. Printing Self-Lam label not allowed • Replace the tape cassette. Self-Lam labels can only be printed on 24 mm Self-Laminated • position. If you still need assistance, contact DYMO Customer Support for your country. A list of contact numbers for each country is - Dymo Rhino 6000 Industrial Label Printer | User Guide - Page 28
This could damage equipment or injure users. Thoroughly follow the instructions below. While Charging èDanger • When charging the battery, use is not completed within the specified time. èCaution • Thoroughly read this user guide before charging the battery. • Do not charge in a place that generates - Dymo Rhino 6000 Industrial Label Printer | User Guide - Page 29
your feedback. Send us your comments or suggestions about our user guides. Please include the following information with your feedback: • Product name, version number, and page number • Brief description of content (instructions that are inaccurate or unclear, areas where more detail is needed - Dymo Rhino 6000 Industrial Label Printer | User Guide - Page 30
24 - Dymo Rhino 6000 Industrial Label Printer | User Guide - Page 31
The following table provides a list of telephone numbers to reach DYMO Sales and Support departments. You can also reach DYMO at www.dymo.com. Country Australia België/Belgique Canada Ceská Republika Danmark Deutschland España France Hong Kong Hungaria Internationala Ireland Italia Mexico Nederland - Dymo Rhino 6000 Industrial Label Printer | User Guide - Page 32
Standards - Section 3: Emission standard for residential, commercial and light industrial environments. RoHS 2002/95/EC © 2010 Sanford, L.P. All another language without the prior written consent of Sanford, L.P RHINO and RHINO Connect are trademarks or registered trademarks of Sanford, L.P. All
-
 1
1 -
 2
2 -
 3
3 -
 4
4 -
 5
5 -
 6
6 -
 7
7 -
8
-
9
-
10
-
11
-
12
-
13
-
14
-
15
-
16
-
17
-
18
-
19
-
20
-
21
-
22
-
23
-
24
-
25
-
26
-
27
-
28
-
29
-
30
-
31
-
32
 |
 |
Rhino
6000
User Guide