Dymo Rhino 6000 Industrial Label Printer User Guide - Page 18
Inserting Library Text, Adding Graphics, Creating a Series of Labels
 |
View all Dymo Rhino 6000 Industrial Label Printer manuals
Add to My Manuals
Save this manual to your list of manuals |
Page 18 highlights
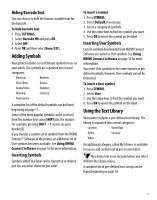
Inserting Library Text Library text added to a label can be edited, formatted, or deleted just like text you enter from the keypad. To add text to a label 1. Press LIBRARY. 2. Select one of the categories. 3. Press the first letter of the text string you wish to use. The cursor jumps to the first text string that begins with that letter. 4. Press OK to insert the text on the label. Adding My Library Text You can download custom text from RHINO Connect Software or you can add custom text to the library directly from the printer. See Using RHINO Connect Software on page 16 for more information. To add custom text 1. Press LIBRARY. 2. Use the arrow keys to select My Library. 3. Select Add new text and press OK. 4. Enter the text and press OK. The text is added to My Library. Deleting My Library Text You can delete custom text from My Library. To delete My Library text 1. Press LIBRARY. 2. Use the arrow keys to select My Library. 3. Select the text to delete. 4. Press . A confirmation message appears. 5. Press OK to delete the text. Adding Graphics When labels are transferred to the printer from RHINO Connect Software, any images are stored separately in the printer as graphic files. You can apply these graphic files to most labels. When a graphic cannot be used with a certain label, a warning appears on the display. See RHINO Connect Software Online Help for more information about placing images on a label. To add a graphic 1. Press SETTINGS. 2. Select Choose graphic and press OK. 3. Select the graphic file you want to use and press OK. The graphic does not appear in the display, but will print on the label. Creating a Series of Labels You can automatically generate labels by creating a series. You create a starting pattern, and then set the increment and count for the series. You can serialize any number or letter by selecting the position to be incremented, such as the number 2 in 123 or the letter B in ABC. For example, when the 2 is selected in 123 and the increment #=3, the resulting labels would print as 123, 153, and 183. Letters can be incremented from A to Z and a to z, and numbers from 1 to 9. When the letter Z or the number 9 is reached during serialization, a letter or number is added to increase the increment. For example, Az increments to Aaa, AZ increments to BA, and A9 increments to A10. Three methods of serialization are available: simple, simultaneous, and advanced. 12
-
 1
1 -
2
-
3
-
4
-
5
-
6
-
7
-
8
-
9
-
10
-
11
-
12
-
 13
13 -
 14
14 -
 15
15 -
 16
16 -
 17
17 -
 18
18 -
 19
19 -
 20
20 -
 21
21 -
 22
22 -
 23
23 -
24
-
25
-
26
-
27
-
28
-
29
-
30
-
31
-
32
 |
 |
