Epson AcuLaser CX11NF Fax Guide - Page 17
Using Fax Polling, Accessing Settings for Receiving Faxes
 |
View all Epson AcuLaser CX11NF manuals
Add to My Manuals
Save this manual to your list of manuals |
Page 17 highlights
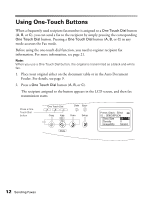
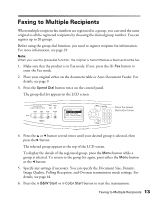
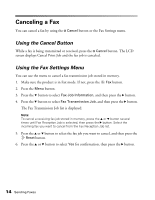
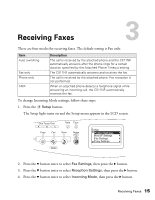
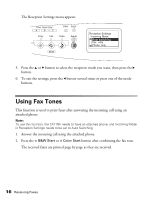
Using Fax Polling This function is used to get the identifying information stored in the other party's fax machine. 1. Make sure the CX11NF is in Fax mode. If not, press the Fax button. 2. Enter the other party's fax number using the numeric keypad. 3. Press the u or d button several times until Polling Rcptn appears, then press the l or r button to select On. 4. When you hear a beep sound or voice guidance, press the x B&W Start or x Color Start button to start the transmission. Accessing Settings for Receiving Faxes You can specify the following settings for receiving faxes. Setting Paper Cassette Incoming Mode Attached Phone Timeout DRPD Options Auto, MP Tray, Paper Cassette Autoswitching, Fax only, Phone only, TAM 1 to 99 On, Off (Normal, All) 1. Press the Setup button on the control panel. The Setup light turns on and the Setup menu appears in the LCD screen. 2. Press the d button twice to select Fax Settings, then press the r button. The Fax Settings menu appears. 3. Press the d button twice to select Reception Settings, then press the r button. 4. Press the u or d button several times to select the item you would like to change, then press the r button. When you set the Attached Phone Timeout, you can also specify the number of seconds with the numeric keypad. Using Fax Polling 17
-
 1
1 -
2
-
3
-
4
-
5
-
6
-
7
-
8
-
9
-
10
-
11
-
 12
12 -
 13
13 -
 14
14 -
 15
15 -
 16
16 -
 17
17 -
 18
18 -
 19
19 -
 20
20 -
 21
21 -
 22
22 -
23
-
24
-
25
-
26
-
27
-
28
-
29
-
30
-
31
-
32
-
33
-
34
-
35
-
36
-
37
-
38
-
39
-
40
-
41
-
42
-
43
-
44
-
45
-
46
-
47
-
48
-
49
-
50
-
51
-
52
-
53
-
54
-
55
-
56
-
57
-
58
-
59
-
60
-
61
-
62
-
63
-
64
 |
 |
