Epson AcuLaser CX11NF Fax Guide - Page 33
The Register Group [Add] window appears, The registered recipient is added to the group.
 |
View all Epson AcuLaser CX11NF manuals
Add to My Manuals
Save this manual to your list of manuals |
Page 33 highlights
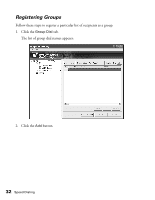
The Register Group [Add] window appears: 3. Select a Group Number from the drop-down list. You can select a number from 1 to 20. 4. Type a Group Name. 5. From the Speed Dial Data Available for Registration table, select a registered recipient from the list, then click the Add to Group button. The registered recipient is added to the group. 6. Repeat step 5 for each recipient to be added to the group. 7. When you have finished adding the recipients to the group, click the OK button. The group is registered and appears in the Group Dial tab. Using the Speed Dial Utility (Windows Only) 33
-
 1
1 -
2
-
3
-
4
-
5
-
6
-
7
-
8
-
9
-
10
-
11
-
12
-
13
-
14
-
15
-
16
-
17
-
18
-
19
-
20
-
21
-
22
-
23
-
24
-
25
-
26
-
27
-
 28
28 -
 29
29 -
 30
30 -
 31
31 -
 32
32 -
 33
33 -
 34
34 -
 35
35 -
 36
36 -
 37
37 -
 38
38 -
39
-
40
-
41
-
42
-
43
-
44
-
45
-
46
-
47
-
48
-
49
-
50
-
51
-
52
-
53
-
54
-
55
-
56
-
57
-
58
-
59
-
60
-
61
-
62
-
63
-
64
 |
 |

Using the Speed Dial Utility (Windows Only)
33
The Register Group [Add] window appears:
3.
Select a
Group Number
from the drop-down list. You can select a number from
1 to 20.
4.
Type a
Group Name
.
5.
From the Speed Dial Data Available for Registration table, select a registered
recipient from the list, then click the
Add to Group
button.
The registered recipient is added to the group.
6.
Repeat step 5 for each recipient to be added to the group.
7.
When you have finished adding the recipients to the group, click the
OK
button.
The group is registered and appears in the Group Dial tab.