Epson AcuLaser CX11NF Fax Guide - Page 30
from 1 to 60., Select the Speed Dial Number from the drop-down list. You can select a number
 |
View all Epson AcuLaser CX11NF manuals
Add to My Manuals
Save this manual to your list of manuals |
Page 30 highlights
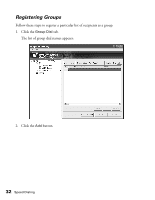
3. Select the Speed Dial Number from the drop-down list. You can select a number from 1 to 60. 4. Type the Recipient Name. 5. Type the Telephone Number. 6. Click the OK button. The number is added to the registered recipient list. Note: Remember to click the Save button to save any changes. For more information, see page 37. Remember to click Send Record to send changes to the CX11NF. For more information, see page 40. To add your name to the fax cover page on faxes you send, see page 36. 30 Speed Dialing
-
 1
1 -
2
-
3
-
4
-
5
-
6
-
7
-
8
-
9
-
10
-
11
-
12
-
13
-
14
-
15
-
16
-
17
-
18
-
19
-
20
-
21
-
22
-
23
-
24
-
 25
25 -
 26
26 -
 27
27 -
 28
28 -
 29
29 -
 30
30 -
 31
31 -
 32
32 -
 33
33 -
 34
34 -
 35
35 -
36
-
37
-
38
-
39
-
40
-
41
-
42
-
43
-
44
-
45
-
46
-
47
-
48
-
49
-
50
-
51
-
52
-
53
-
54
-
55
-
56
-
57
-
58
-
59
-
60
-
61
-
62
-
63
-
64
 |
 |

30
Speed Dialing
3.
Select the Speed Dial Number from the drop-down list. You can select a number
from 1 to 60.
4.
Type the
Recipient Name
.
5.
Type the
Telephone Number
.
6.
Click the
OK
button.
The number is added to the registered recipient list.
Note:
Remember to click the
Save
button to save any changes. For more information,
see page 37.
Remember to click
Send Record
to send changes to the CX11NF. For more
information, see page 40.
To add your name to the fax cover page on faxes you send, see page 36.