Epson RX700 Basics - Page 30
Custom Printing Your Photos
 |
UPC - 010343853775
View all Epson RX700 manuals
Add to My Manuals
Save this manual to your list of manuals |
Page 30 highlights
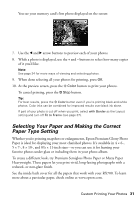
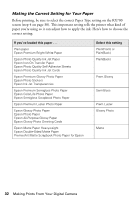
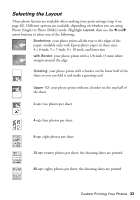
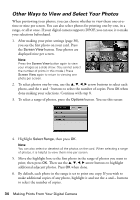
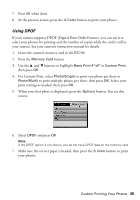
Note: If your camera supports DPOF, you can use it to select the photos you want to print and the number of copies. For more information, see page 34. 6. When done selecting all your photos for printing, press OK. 7. At the preview screen, press the x Color button to print your photos. Note: Press the Options button if you'd like to print the date and/or time your photo was taken. Select the desired format, then press OK. To cancel printing, press the y Stop button. Custom Printing Your Photos After inserting a memory card, you can view and select the photos you want to print from the RX700 screen. Depending on how you want to display your photos, you can choose from various sizes and types of Epson paper to get just the results you want. See page 31 for some suggestions. 1. Press the Memory Card button. 2. Select Custom Print, then press OK. 3. Select Photo (Single) to print one photo per sheet. To use a multi-photo layout, select Photo (Multi). 4. Use the u, d, l, r arrow buttons to select these settings: ■ Paper Type: Select the setting for the type of paper you've loaded (see page 32). ■ Paper Size: Select the size of paper you've loaded. ■ Layout: Select your desired layout option. See page 33 for a complete list of layouts. 5. If you would like to change the print Quality setting or make any special enhancements to your photos, press the Options button. See page 36. 6. Press OK when done making your selections. 30 Making Prints From Your Digital Camera
-
 1
1 -
2
-
3
-
4
-
5
-
6
-
7
-
8
-
9
-
10
-
11
-
12
-
13
-
14
-
15
-
16
-
17
-
18
-
19
-
20
-
21
-
22
-
23
-
24
-
 25
25 -
 26
26 -
 27
27 -
 28
28 -
 29
29 -
 30
30 -
 31
31 -
 32
32 -
 33
33 -
 34
34 -
 35
35 -
36
-
37
-
38
-
39
-
40
-
41
-
42
-
43
-
44
-
45
-
46
-
47
-
48
-
49
-
50
-
51
-
52
-
53
-
54
-
55
-
56
-
57
-
58
-
59
-
60
-
61
-
62
-
63
-
64
-
65
-
66
-
67
-
68
-
69
-
70
-
71
-
72
-
73
-
74
-
75
-
76
-
77
-
78
-
79
-
80
-
81
-
82
-
83
-
84
-
85
-
86
-
87
-
88
-
89
-
90
-
91
-
92
-
93
-
94
-
95
-
96
-
97
-
98
 |
 |
