Epson RX700 Basics - Page 42
Cropping a Photo, then press
 |
UPC - 010343853775
View all Epson RX700 manuals
Add to My Manuals
Save this manual to your list of manuals |
Page 42 highlights
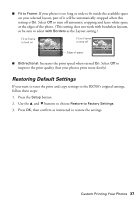
8. When you have finished selecting your print settings, press OK. 9. Use your camera to select the photos you want to print, adjust any necessary settings, and print your photos. See your camera's manual for details. Note: Be sure to make the desired print settings on your camera, because its settings generally take precedence over those on the RX700. If your camera is not compatible with PictBridge or USB Direct Print, you'll see a message saying that the connected device cannot be used. Epson cannot guarantee the compatibility of any cameras. Cropping a Photo If you have a photo with a subject in it you want to emphasize, you can crop out the rest of the photo. Then you can print just the main subject by itself. Note: You can crop and print only one photo at a time. Cropping does not change the original file on your memory card; it changes only the way the photo is printed. 1. Load the type of paper you want to print with in the rear sheet feeder (see page 31). 2. Press the Memory Card button. 3. Select Custom Print then press OK. 4. Select Crop then press OK. 5. Adjust the print settings for the type of paper you've loaded and your desired layout, then press OK (see page 30). 6. Use the l and r buttons to select the photo you want to crop, then press OK. You see the cropping screen: 42 Making Prints From Your Digital Camera
-
 1
1 -
2
-
3
-
4
-
5
-
6
-
7
-
8
-
9
-
10
-
11
-
12
-
13
-
14
-
15
-
16
-
17
-
18
-
19
-
20
-
21
-
22
-
23
-
24
-
25
-
26
-
27
-
28
-
29
-
30
-
31
-
32
-
33
-
34
-
35
-
36
-
 37
37 -
 38
38 -
 39
39 -
 40
40 -
 41
41 -
 42
42 -
 43
43 -
 44
44 -
 45
45 -
 46
46 -
 47
47 -
48
-
49
-
50
-
51
-
52
-
53
-
54
-
55
-
56
-
57
-
58
-
59
-
60
-
61
-
62
-
63
-
64
-
65
-
66
-
67
-
68
-
69
-
70
-
71
-
72
-
73
-
74
-
75
-
76
-
77
-
78
-
79
-
80
-
81
-
82
-
83
-
84
-
85
-
86
-
87
-
88
-
89
-
90
-
91
-
92
-
93
-
94
-
95
-
96
-
97
-
98
 |
 |
