Epson RX700 Basics - Page 40
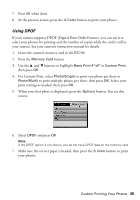
each photo to select 1
 |
UPC - 010343853775
View all Epson RX700 manuals
Add to My Manuals
Save this manual to your list of manuals |
Page 40 highlights
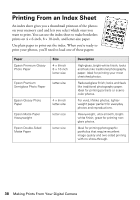
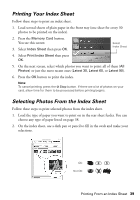
■ Select the size and type of paper you loaded, as listed below: If you loaded this paper . . . Epson Premium Glossy Photo Paper Epson Premium Semigloss Photo Paper Epson Glossy Photo Paper Epson Matte Paper Heavyweight Epson Double-Sided Matte Paper Choose one of these options Prem. Glossy - 4 × 6 in. Prem. Glossy - 8 × 10 in. Prem. Glossy - Letter Glossy Photo - 4 × 6 in. Glossy Photo - Letter Matte - Letter ■ Select whether to print your photos with or without white borders. ■ Fill in the Date oval to include an optional date stamp. ■ Select ALL to print one copy of each photo, or fill in the number beneath each photo to select 1, 2, or 3 copies. 3. Place the index sheet face-down on the scanner glass, so that the top edge of the sheet is aligned with the left edge of the glass. Top edge of sheet Left edge of glass 4. Close the scanner lid. 5. On the control panel, make sure Scan Index Sheet is highlighted, then press the OK button. The sheet is scanned and your photos are printed. Note: To cancel printing, press the y Stop button. If you have more than one index sheet, wait for the RX700 to finish printing. Then repeat the steps above to scan and print from each additional sheet. 40 Making Prints From Your Digital Camera
-
 1
1 -
2
-
3
-
4
-
5
-
6
-
7
-
8
-
9
-
10
-
11
-
12
-
13
-
14
-
15
-
16
-
17
-
18
-
19
-
20
-
21
-
22
-
23
-
24
-
25
-
26
-
27
-
28
-
29
-
30
-
31
-
32
-
33
-
34
-
 35
35 -
 36
36 -
 37
37 -
 38
38 -
 39
39 -
 40
40 -
 41
41 -
 42
42 -
 43
43 -
 44
44 -
 45
45 -
46
-
47
-
48
-
49
-
50
-
51
-
52
-
53
-
54
-
55
-
56
-
57
-
58
-
59
-
60
-
61
-
62
-
63
-
64
-
65
-
66
-
67
-
68
-
69
-
70
-
71
-
72
-
73
-
74
-
75
-
76
-
77
-
78
-
79
-
80
-
81
-
82
-
83
-
84
-
85
-
86
-
87
-
88
-
89
-
90
-
91
-
92
-
93
-
94
-
95
-
96
-
97
-
98
 |
 |
