Epson Stylus Pro 5000 User Manual - Page 47
Aligning the Print Head, run a cleaning cycle, as described
 |
View all Epson Stylus Pro 5000 manuals
Add to My Manuals
Save this manual to your list of manuals |
Page 47 highlights
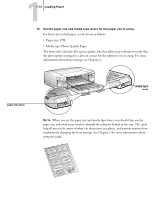
11-15 Aligning the Print Head • If the pattern has broken lines or missing segments, as in the following example, your printer may have a clogged ink nozzle. Run a cleaning cycle before you align the print head. See page 4-1 for instructions. • If nothing prints at all, make sure your ink cartridges are correctly installed. Then run a cleaning cycle, as described on page 4-1. Aligning the Print Head Before you use the printer, you should align the print head to ensure accurate, clean printouts. Make sure the printer is turned off, and it has paper in the standard paper tray. TO ALIGN THE PRINT HEAD: 1. Hold down both the Reset and Eject buttons while you press the P Operate button to turn on the printer. The P Operate light and [ lower paper tray light start flashing and the printer enters the print head alignment mode. A pattern similar to the one below is printed: 2. Check the printout and select the numbered pattern, from #1 to #4, that is misaligned. (If more than one pattern is misaligned you will need to repeat this step.) For example, pattern #1 above requires alignment.
-
 1
1 -
2
-
3
-
4
-
5
-
6
-
7
-
8
-
9
-
10
-
11
-
12
-
13
-
14
-
15
-
16
-
17
-
18
-
19
-
20
-
21
-
22
-
23
-
24
-
25
-
26
-
27
-
28
-
29
-
30
-
31
-
32
-
33
-
34
-
35
-
36
-
37
-
38
-
39
-
40
-
41
-
 42
42 -
 43
43 -
 44
44 -
 45
45 -
 46
46 -
 47
47 -
 48
48 -
 49
49 -
 50
50 -
 51
51 -
 52
52 -
53
-
54
-
55
-
56
-
57
-
58
-
59
-
60
-
61
-
62
-
63
-
64
-
65
-
66
-
67
-
68
-
69
-
70
-
71
-
72
-
73
-
74
-
75
-
76
-
77
-
78
-
79
-
80
-
81
-
82
-
83
-
84
-
85
-
86
-
87
-
88
-
89
-
90
-
91
-
92
-
93
-
94
-
95
-
96
-
97
-
98
 |
 |
