Epson WorkForce 600 Quick Guide - Page 19
Creating Your Group Dial List, and repeat the steps
 |
View all Epson WorkForce 600 manuals
Add to My Manuals
Save this manual to your list of manuals |
Page 19 highlights
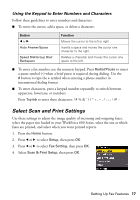
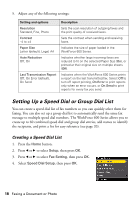
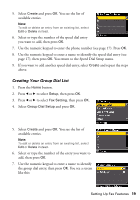
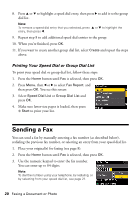
5. Select Create and press OK. You see the list of available entries. Note: To edit or delete an entry from an existing list, select Edit or Delete instead. 6. Select or type the number of the speed dial entry you want to add, then press OK. 7. Use the numeric keypad to enter the phone number (see page 17). Press OK. 8. Use the numeric keypad to enter a name to identify the speed dial entry (see page 17), then press OK. You return to the Speed Dial Setup menu. 9. If you want to add another speed dial entry, select Create and repeat the steps above. Creating Your Group Dial List 1. Press the Home button. 2. Press l or r to select Setup, then press OK. 3. Press l or r to select Fax Setting, then press OK. 4. Select Group Dial Setup and press OK. 5. Select Create and press OK. You see the list of available entries. Note: To edit or delete an entry from an existing list, select Edit or Delete instead. 6. Select or type the number of the entry you want to add, then press OK. 7. Use the numeric keypad to enter a name to identify the group dial entry, then press OK. You see a screen like this: Setting Up Fax Features 19
-
 1
1 -
2
-
3
-
4
-
5
-
6
-
7
-
8
-
9
-
10
-
11
-
12
-
13
-
 14
14 -
 15
15 -
 16
16 -
 17
17 -
 18
18 -
 19
19 -
 20
20 -
 21
21 -
 22
22 -
 23
23 -
 24
24 -
25
-
26
-
27
-
28
-
29
-
30
-
31
-
32
-
33
-
34
-
35
-
36
-
37
-
38
-
39
-
40
-
41
-
42
-
43
-
44
-
45
-
46
-
47
-
48
-
49
-
50
-
51
-
52
-
53
-
54
-
55
-
56
 |
 |
