Epson WorkForce 600 Quick Guide - Page 25
and select, on the screen, press
 |
View all Epson WorkForce 600 manuals
Add to My Manuals
Save this manual to your list of manuals |
Page 25 highlights
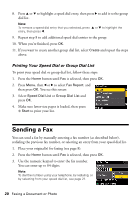
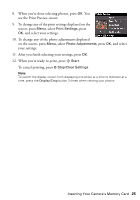
8. When you're done selecting photos, press OK. You see the Print Preview screen: 9. To change any of the print settings displayed on the screen, press Menu, select Print Settings, press OK, and select your settings. 10. To change any of the photo adjustments displayed on the screen, press Menu, select Photo Adjustments, press OK, and select your settings. 11. After you finish selecting your settings, press OK. 12. When you're ready to print, press Start. To cancel printing, press y Stop/Clear Settings. Note: To switch the display screen from displaying one photo at a time to 9 photos at a time, press the Display/Crop button 3 times when viewing your photos. Inserting Your Camera's Memory Card 25
-
 1
1 -
2
-
3
-
4
-
5
-
6
-
7
-
8
-
9
-
10
-
11
-
12
-
13
-
14
-
15
-
16
-
17
-
18
-
19
-
 20
20 -
 21
21 -
 22
22 -
 23
23 -
 24
24 -
 25
25 -
 26
26 -
 27
27 -
 28
28 -
 29
29 -
 30
30 -
31
-
32
-
33
-
34
-
35
-
36
-
37
-
38
-
39
-
40
-
41
-
42
-
43
-
44
-
45
-
46
-
47
-
48
-
49
-
50
-
51
-
52
-
53
-
54
-
55
-
56
 |
 |

Inserting Your Camera’s Memory Card
25
8.
When you’re done selecting photos, press
OK
. You
see the Print Preview screen:
9.
To change any of the print settings displayed on the
screen, press
Menu
, select
Print Settings
, press
OK
, and select your settings.
10.
To change any of the photo adjustments displayed
on the screen, press
Menu
, select
Photo Adjustments
, press
OK
, and select
your settings.
11.
After you finish selecting your settings, press
OK
.
12.
When you’re ready to print, press
Start
.
To cancel printing, press
y
Stop/Clear Settings
.
Note:
To switch the display screen from displaying one photo at a time to 9 photos at a
time, press the
Display/Crop
button 3 times when viewing your photos.