Epson WorkForce 610 Quick Guide - Page 17
Setting Up Fax Features - printer not printing
 |
UPC - 010343871878
View all Epson WorkForce 610 manuals
Add to My Manuals
Save this manual to your list of manuals |
Page 17 highlights
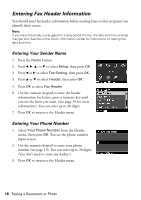
2. To use a telephone or answering machine, you need a second phone cable. Connect one end of the cable to the telephone or answering machine, and connect the other end to the EXT. port on the back of the product. Note: Remove the connector cap from the EXT. port before connecting a phone or answering machine. If your answering machine is set to pick up on the fourth ring, you should set the printer to pick up on the fifth ring or later: 1. Press the Home button. 2. Press l, r, u, or d to select Setup, then press OK 3. Press l or r to select Fax Setting, then press OK. 4. Select Communication, then press OK. 5. Press u or d to select Rings to Answer, then press r. 6. Press u or d to select the number of rings, then press OK. Select more than the number of rings needed for the answering machine to pick up. When you receive a call, if the other party is a fax and you pick up the phone or the answering machine answers, the product automatically begins receiving the transmission. If the other party is a caller, the phone can be used as normal or a message can be left on the answering machine. Note: A phone or answering machine must be connected to the EXT. port for the product to detect an incoming fax call when a phone is picked up. If a fax call comes in, and you pick up the phone without having a phone or answering machine connected to the EXT. port, the call will disconnect when you hang up and the product will not receive the fax. Setting Up Fax Features Before sending or receiving faxes, you may want to create a fax header, select your fax preferences, and set up a speed dial list of frequently used fax numbers. ■ "Entering Fax Header Information" on page 18 ■ "Select Scan and Print Settings" on page 19 ■ "Setting Up a Speed Dial or Group Dial List" on page 20 Note: To change other settings or print fax reports, see the online Epson Information Center. Setting Up Fax Features 17
-
 1
1 -
2
-
3
-
4
-
5
-
6
-
7
-
8
-
9
-
10
-
11
-
 12
12 -
 13
13 -
 14
14 -
 15
15 -
 16
16 -
 17
17 -
 18
18 -
 19
19 -
 20
20 -
 21
21 -
 22
22 -
23
-
24
-
25
-
26
-
27
-
28
-
29
-
30
-
31
-
32
-
33
-
34
-
35
-
36
-
37
-
38
-
39
-
40
-
41
-
42
-
43
-
44
-
45
-
46
-
47
-
48
-
49
-
50
-
51
-
52
-
53
-
54
-
55
-
56
-
57
-
58
-
59
-
60
 |
 |
