HP 722c (English) User's Guide - C5870-90010 - Page 7
Rinter - printer parts
 |
View all HP 722c manuals
Add to My Manuals
Save this manual to your list of manuals |
Page 7 highlights
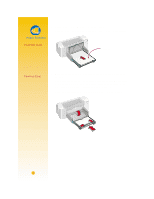
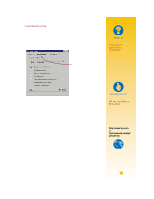
HOW TO PUT PAPER IN THE PRINTER Take a second to load the paper correctly in the IN drawer. Make sure all the paper in the drawer is the same size and type, and that the paper adjusters rest snugly against the paper. The printer will do the rest. Let's walk through the process step by step: 1 Slide out the green paper-width and paper-length adjusters to make room for the paper. If you want, you can slide out the IN drawer to insert the paper more easily. You can flip up the OUT tray if you want to see better. Paper-width adjuster OUT tray Paper-length adjuster 2 Fan the edges of the paper stack to separate the pages. Then tap the stack on a flat surface to even it up. You can insert up to 3/8 in or 10 mm at a time. Paper Pointers PAPER THAT MIGHT NOT WORK • Highly textured stock such as linen might not print evenly; the ink could bleed into these papers. • Extremely smooth, shiny, or coated papers not specifically designed for inkjet printers could jam the printer and might actually repel ink. • Multi-part forms (such as duplicate or triplicate forms) could wrinkle in the printer or get stuck; the ink is also more likely to smear. • Paper in poor condition-with tears, dust, wrinkles, or curled or bent edges, or that doesn't lie flat-could jam the printer. 3
-
 1
1 -
 2
2 -
 3
3 -
 4
4 -
 5
5 -
 6
6 -
 7
7 -
 8
8 -
 9
9 -
 10
10 -
 11
11 -
 12
12 -
13
-
14
-
15
-
16
-
17
-
18
-
19
-
20
-
21
-
22
-
23
-
24
-
25
-
26
-
27
-
28
-
29
-
30
-
31
-
32
-
33
-
34
-
35
-
36
-
37
-
38
-
39
-
40
-
41
-
42
-
43
-
44
-
45
-
46
-
47
-
48
-
49
-
50
-
51
-
52
-
53
-
54
-
55
-
56
-
57
-
58
-
59
-
60
-
61
-
62
-
63
-
64
-
65
-
66
 |
 |
