HP BL10e HP ProLiant BL e-Class System Maintenance and Service Guide - Page 29
Removing the Interconnect Tray, Removing the interconnect tray from the enclosure
 |
UPC - 808736933599
View all HP BL10e manuals
Add to My Manuals
Save this manual to your list of manuals |
Page 29 highlights
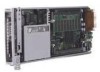
Removal and Replacement Procedures Removing the Interconnect Tray To remove the interconnect tray: 1. Power down each server blade. See the "Powering Down a Server Blade" section in this chapter. 2. Power down the enclosure. See the "Powering Down the Enclosure" section in this chapter. 3. Disconnect all cables and power cords from the AC power source. 4. Disconnect all cables and power cords from the enclosure rear panel. IMPORTANT: Perform steps 5 and 6 simultaneously in both power-supply bays. 5. Remove both hot-plug power supplies. See the "Hot-Plug Power Supplies" section in this chapter. 6. Release the locking latches securing the interconnect tray in the enclosure (1). 7. Pull the release latches toward the rear of the enclosure (2). 8. Remove the interconnect tray from the enclosure (3). Figure 2-10: Removing the interconnect tray from the enclosure Reverse steps 1 through 8 to replace the interconnect tray. IMPORTANT: When installing the interconnect tray, be sure that the release latches are in the open position. When closing the release latches on the interconnect tray, be sure that the locking latches click audibly into place. 2-14 HP ProLiant BL e-Class System Maintenance and Service Guide HP CONFIDENTIAL Codename: MacDuff Part Number: 249066-005 Last Saved On: 7/11/03 7:27 AM
-
 1
1 -
2
-
3
-
4
-
5
-
6
-
7
-
8
-
9
-
10
-
11
-
12
-
13
-
14
-
15
-
16
-
17
-
18
-
19
-
20
-
21
-
22
-
23
-
 24
24 -
 25
25 -
 26
26 -
 27
27 -
 28
28 -
 29
29 -
 30
30 -
 31
31 -
 32
32 -
 33
33 -
 34
34 -
35
-
36
-
37
-
38
-
39
-
40
-
41
-
42
-
43
-
44
-
45
-
46
-
47
-
48
-
49
-
50
-
51
-
52
-
53
-
54
-
55
-
56
-
57
-
58
-
59
-
60
-
61
-
62
-
63
-
64
-
65
-
66
-
67
-
68
-
69
-
70
-
71
-
72
-
73
-
74
-
75
-
76
-
77
-
78
-
79
-
80
-
81
-
82
-
83
-
84
 |
 |
