HP BL10e HP ProLiant BL e-Class System Maintenance and Service Guide - Page 43
Center Wall Assembly, Locating and removing the battery
 |
UPC - 808736933599
View all HP BL10e manuals
Add to My Manuals
Save this manual to your list of manuals |
Page 43 highlights
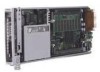
Removal and Replacement Procedures 3. Place the server blade on a level, nonconductive surface. 4. Locate and remove the battery on the server blade. Figure 2-24: Locating and removing the battery NOTE: Figure 2-24 shows the ProLiant BL10e server blade. Reverse steps 1 through 4 to replace the battery. Center Wall Assembly To remove the center wall assembly: 1. Power down each server blade. See the "Powering Down a Server Blade" section in this chapter. 2. Power down the enclosure. See the "Powering Down the Enclosure" section in this chapter. 3. Disconnect all cables and power cords from the AC power source. 4. Disconnect all cables and power cords from the enclosure rear panel. 5. Remove all server blades and server blade blanks. See the "Removing a Server Blade" and the "Removing a Server Blade Blank" sections in this chapter. CAUTION: Integrated Administrator security settings are assigned to server blade bays, not to server blades. If server blades change locations within the enclosure, Integrated Administrator settings must also be adjusted to ensure accurate security. Refer to the HP ProLiant BL e-Class Integrated Administrator User Guide for more information on security settings. 6. Remove both hot-plug power supplies. See the "Hot-Plug Power Supplies" section in this chapter. 2-28 HP ProLiant BL e-Class System Maintenance and Service Guide HP CONFIDENTIAL Codename: MacDuff Part Number: 249066-005 Last Saved On: 7/11/03 7:27 AM
-
 1
1 -
2
-
3
-
4
-
5
-
6
-
7
-
8
-
9
-
10
-
11
-
12
-
13
-
14
-
15
-
16
-
17
-
18
-
19
-
20
-
21
-
22
-
23
-
24
-
25
-
26
-
27
-
28
-
29
-
30
-
31
-
32
-
33
-
34
-
35
-
36
-
37
-
 38
38 -
 39
39 -
 40
40 -
 41
41 -
 42
42 -
 43
43 -
 44
44 -
 45
45 -
 46
46 -
 47
47 -
 48
48 -
49
-
50
-
51
-
52
-
53
-
54
-
55
-
56
-
57
-
58
-
59
-
60
-
61
-
62
-
63
-
64
-
65
-
66
-
67
-
68
-
69
-
70
-
71
-
72
-
73
-
74
-
75
-
76
-
77
-
78
-
79
-
80
-
81
-
82
-
83
-
84
 |
 |
