HP BL10e HP ProLiant BL e-Class System Maintenance and Service Guide - Page 42
Hard Drive Assembly, Server Blade Battery - proliant quickspecs
 |
UPC - 808736933599
View all HP BL10e manuals
Add to My Manuals
Save this manual to your list of manuals |
Page 42 highlights
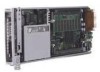
Removal and Replacement Procedures Hard Drive Assembly IMPORTANT: Hard drives and processors for the ProLiant BL e-Class server blade are model specific. For more information, refer to the QuickSpecs on the HP website. To remove the hard drive assembly from a ProLiant BL e-Class server blade: 1. Power down the server blade. See the "Powering Down a Server Blade" section in this chapter. 2. Remove the server blade from the enclosure. See the "Removing a Server Blade" section in this chapter. 3. Place on a level, nonconductive surface. 4. Using a Torx T-15 tool, remove the screws holding the hard drive assembly to the server blade (1). 5. Slide the hard drive assembly toward the processor, and lift it from the server blade (2). Figure 2-23: Removing the hard drive assembly from a server blade NOTE: Figure 2-23 shows the ProLiant BL10e server blade. Reverse steps 1 through 5 to replace a hard drive assembly. Server Blade Battery To remove a server blade battery: 1. Power down the server blade. See the "Powering Down a Server Blade" section in this chapter. 2. Remove the server blade from the enclosure. See the "Removing a Server Blade from the Enclosure" section in this chapter. HP ProLiant BL e-Class System Maintenance and Service Guide 2-27 HP CONFIDENTIAL Codename: MacDuff Part Number: 249066-005 Last Saved On: 7/11/03 7:27 AM
-
 1
1 -
2
-
3
-
4
-
5
-
6
-
7
-
8
-
9
-
10
-
11
-
12
-
13
-
14
-
15
-
16
-
17
-
18
-
19
-
20
-
21
-
22
-
23
-
24
-
25
-
26
-
27
-
28
-
29
-
30
-
31
-
32
-
33
-
34
-
35
-
36
-
 37
37 -
 38
38 -
 39
39 -
 40
40 -
 41
41 -
 42
42 -
 43
43 -
 44
44 -
 45
45 -
 46
46 -
 47
47 -
48
-
49
-
50
-
51
-
52
-
53
-
54
-
55
-
56
-
57
-
58
-
59
-
60
-
61
-
62
-
63
-
64
-
65
-
66
-
67
-
68
-
69
-
70
-
71
-
72
-
73
-
74
-
75
-
76
-
77
-
78
-
79
-
80
-
81
-
82
-
83
-
84
 |
 |
