HP Color LaserJet Enterprise MFP M681 User Guide - Page 236
Table 9-8, Fixing/fuser defects, Image placement defects
 |
View all HP Color LaserJet Enterprise MFP M681 manuals
Add to My Manuals
Save this manual to your list of manuals |
Page 236 highlights
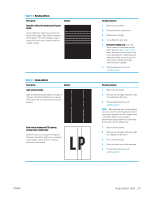
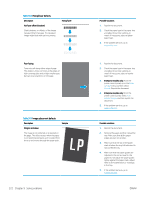
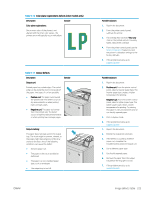
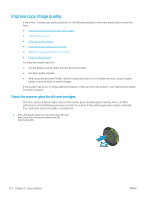
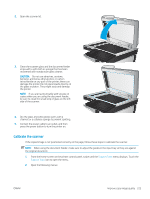
Table 9-8 Fixing/fuser defects Description Hot fuser offset (shadow): Slight shadows, or offsets, of the image repeated down the page. The repeated image might fade with each recurrence. Fixing/fuser Poor fusing: Toner rubs off along either edge of page. This defect is more common at the edges of high-coverage jobs and on light media types but can occur anywhere on the page. Table 9-9 Image placement defects Description Sample Margins and skew: The image is not centered, or is skewed on the page. The defect occurs when the paper is not positioned properly as it is pulled from the tray and moves through the paper path. 222 Chapter 9 Solve problems Possible solutions 1. Reprint the document. 2. Check the paper type in the paper tray and adjust the printer settings to match. If necessary, select a lighter paper type. 3. If the problem persists, go to support.hp.com. 1. Reprint the document. 2. Check the paper type in the paper tray and adjust the printer settings to match. If necessary, select a heavier paper type. 3. Enterprise models only: From the printer control panel, go to the Edgeto-Edge menu and then select Normal. Reprint the document. 4. Enterprise models only: From the printer control panel, select Auto Include Margins and then reprint the document. 5. If the problem persists, go to support.hp.com. Possible solutions 1. Reprint the document. 2. Remove the paper and then reload the tray. Make sure that all the paper edges are even on all sides. 3. Make sure that the top of the paper stack is below the tray full indicator. Do not overfill the tray. 4. Make sure that the paper guides are adjusted to the correct size for the paper. Do not adjust the paper guides tightly against the paper stack. Adjust them to the indentations or markings in the tray. 5. If the problem persists, go to support.hp.com. ENWW
-
 1
1 -
2
-
3
-
4
-
5
-
6
-
7
-
8
-
9
-
10
-
11
-
12
-
13
-
14
-
15
-
16
-
17
-
18
-
19
-
20
-
21
-
22
-
23
-
24
-
25
-
26
-
27
-
28
-
29
-
30
-
31
-
32
-
33
-
34
-
35
-
36
-
37
-
38
-
39
-
40
-
41
-
42
-
43
-
44
-
45
-
46
-
47
-
48
-
49
-
50
-
51
-
52
-
53
-
54
-
55
-
56
-
57
-
58
-
59
-
60
-
61
-
62
-
63
-
64
-
65
-
66
-
67
-
68
-
69
-
70
-
71
-
72
-
73
-
74
-
75
-
76
-
77
-
78
-
79
-
80
-
81
-
82
-
83
-
84
-
85
-
86
-
87
-
88
-
89
-
90
-
91
-
92
-
93
-
94
-
95
-
96
-
97
-
98
-
99
-
100
-
101
-
102
-
103
-
104
-
105
-
106
-
107
-
108
-
109
-
110
-
111
-
112
-
113
-
114
-
115
-
116
-
117
-
118
-
119
-
120
-
121
-
122
-
123
-
124
-
125
-
126
-
127
-
128
-
129
-
130
-
131
-
132
-
133
-
134
-
135
-
136
-
137
-
138
-
139
-
140
-
141
-
142
-
143
-
144
-
145
-
146
-
147
-
148
-
149
-
150
-
151
-
152
-
153
-
154
-
155
-
156
-
157
-
158
-
159
-
160
-
161
-
162
-
163
-
164
-
165
-
166
-
167
-
168
-
169
-
170
-
171
-
172
-
173
-
174
-
175
-
176
-
177
-
178
-
179
-
180
-
181
-
182
-
183
-
184
-
185
-
186
-
187
-
188
-
189
-
190
-
191
-
192
-
193
-
194
-
195
-
196
-
197
-
198
-
199
-
200
-
201
-
202
-
203
-
204
-
205
-
206
-
207
-
208
-
209
-
210
-
211
-
212
-
213
-
214
-
215
-
216
-
217
-
218
-
219
-
220
-
221
-
222
-
223
-
224
-
225
-
226
-
227
-
228
-
229
-
230
-
 231
231 -
 232
232 -
 233
233 -
 234
234 -
 235
235 -
 236
236 -
 237
237 -
 238
238 -
 239
239 -
 240
240 -
 241
241 -
242
-
243
-
244
-
245
-
246
-
247
-
248
-
249
-
250
-
251
-
252
-
253
-
254
-
255
-
256
-
257
-
258
-
259
-
260
-
261
-
262
-
263
-
264
 |
 |
