HP Color LaserJet Enterprise MFP M681 User Guide - Page 75
Automatically print on both sides (Windows), Finishing, Paper, Quality, Print, Properties, Preferences
 |
View all HP Color LaserJet Enterprise MFP M681 manuals
Add to My Manuals
Save this manual to your list of manuals |
Page 75 highlights
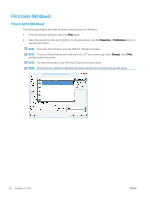
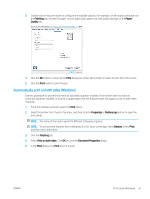
3. Clickthe tabs in the print driver to configure the available options. For example, set the paper orientation on the Finishing tab, and set the paper source, paper type, paper size, and quality settings on the Paper/ Quality tab. 4. Click the OK button to return to the Print dialog box. Select the number of copies to print from this screen. 5. Click the Print button to print the job. Automatically print on both sides (Windows) Use this procedure for printers that have an automatic duplexer installed. If the printer does not have an automatic duplexer installed, or to print on paper types that the duplexer does not support, print on both sides manually. 1. From the software program, select the Print option. 2. Select the printer from the list of printers, and then click the Properties or Preferences button to open the print driver. NOTE: The name of the button varies for different software programs. NOTE: To access these features from a Windows 8 or 8.1 Start screen app, select Devices, select Print, and then select the printer. 3. Click the Finishing tab. 4. Select Print on both sides. Click OK to close the Document Properties dialog. 5. In the Print dialog, click Print to print the job. ENWW Print tasks (Windows) 61
-
 1
1 -
2
-
3
-
4
-
5
-
6
-
7
-
8
-
9
-
10
-
11
-
12
-
13
-
14
-
15
-
16
-
17
-
18
-
19
-
20
-
21
-
22
-
23
-
24
-
25
-
26
-
27
-
28
-
29
-
30
-
31
-
32
-
33
-
34
-
35
-
36
-
37
-
38
-
39
-
40
-
41
-
42
-
43
-
44
-
45
-
46
-
47
-
48
-
49
-
50
-
51
-
52
-
53
-
54
-
55
-
56
-
57
-
58
-
59
-
60
-
61
-
62
-
63
-
64
-
65
-
66
-
67
-
68
-
69
-
 70
70 -
 71
71 -
 72
72 -
 73
73 -
 74
74 -
 75
75 -
 76
76 -
 77
77 -
 78
78 -
 79
79 -
 80
80 -
81
-
82
-
83
-
84
-
85
-
86
-
87
-
88
-
89
-
90
-
91
-
92
-
93
-
94
-
95
-
96
-
97
-
98
-
99
-
100
-
101
-
102
-
103
-
104
-
105
-
106
-
107
-
108
-
109
-
110
-
111
-
112
-
113
-
114
-
115
-
116
-
117
-
118
-
119
-
120
-
121
-
122
-
123
-
124
-
125
-
126
-
127
-
128
-
129
-
130
-
131
-
132
-
133
-
134
-
135
-
136
-
137
-
138
-
139
-
140
-
141
-
142
-
143
-
144
-
145
-
146
-
147
-
148
-
149
-
150
-
151
-
152
-
153
-
154
-
155
-
156
-
157
-
158
-
159
-
160
-
161
-
162
-
163
-
164
-
165
-
166
-
167
-
168
-
169
-
170
-
171
-
172
-
173
-
174
-
175
-
176
-
177
-
178
-
179
-
180
-
181
-
182
-
183
-
184
-
185
-
186
-
187
-
188
-
189
-
190
-
191
-
192
-
193
-
194
-
195
-
196
-
197
-
198
-
199
-
200
-
201
-
202
-
203
-
204
-
205
-
206
-
207
-
208
-
209
-
210
-
211
-
212
-
213
-
214
-
215
-
216
-
217
-
218
-
219
-
220
-
221
-
222
-
223
-
224
-
225
-
226
-
227
-
228
-
229
-
230
-
231
-
232
-
233
-
234
-
235
-
236
-
237
-
238
-
239
-
240
-
241
-
242
-
243
-
244
-
245
-
246
-
247
-
248
-
249
-
250
-
251
-
252
-
253
-
254
-
255
-
256
-
257
-
258
-
259
-
260
-
261
-
262
-
263
-
264
 |
 |
