HP DL360 HP Insight Diagnostics User Guide - Page 13
Using Insight Diagnostics Commands in Linux, Starting the Offline Edition
 |
UPC - 613326948835
View all HP DL360 manuals
Add to My Manuals
Save this manual to your list of manuals |
Page 13 highlights
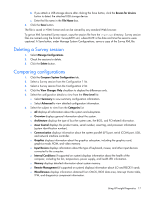
Parameter -a -rd -? , -h Description Append the output to an existing output file. If no -o option is specified, this option is ignored. To avoid XML parsing errors, use this option with the plain text (-p). Run a diagnosis of all diagnosable devices. The test results are posted to the Diagnosis Log (diagnosislog.xml). Display help. Using Insight Diagnostics Commands in Linux To use the command line switches in Linux: 1. Open a Terminal window if necessary. 2. Change to the /opt/hp/hpdiags directory. 3. Enter the command with the preferred switch. See the following examples: • To capture Survey configuration information, and then send the XML file to a terminal, enter either of the following commands: o # ./hpdiags -t o # /opt/hp/hpdiags/hpdiags -t For example, if, every Monday at 5:00 AM, you want Insight Diagnostics to compare the original Survey configuration file to the current Survey configuration, and then save the result to a remote file in plain-text format, type the following command: # ./hpdiags -s "0005**01" -c surveybase.xml -p -o /mnt/remoteserver/surveycompare.txt • To verify the System Management Homepage status on a Linux server, enter the following command: /etc/init.d/hpsmhd status Starting the Offline Edition Starting from an HP SmartStart CD On an HP ProLiant server, start HP Insight Diagnostics Offline Edition from the HP SmartStart CD: 1. Insert the HP SmartStart CD into the optical drive. 2. Shut down the operating system, and then power off the server. 3. Power on the server. The system boots from the SmartStart CD. If the system does not boot to the CD in the optical drive, you might need to change the boot order in the Computer Setup (F10) utility so that the system boots to the optical drive before booting to the hard drive. For more information, see the Computer Setup (F10) Utility Guide on the Documentation CD. Getting started 13
-
 1
1 -
2
-
3
-
4
-
5
-
6
-
7
-
 8
8 -
 9
9 -
 10
10 -
 11
11 -
 12
12 -
 13
13 -
 14
14 -
 15
15 -
 16
16 -
 17
17 -
 18
18 -
19
-
20
-
21
-
22
-
23
-
24
-
25
-
26
-
27
-
28
-
29
-
30
-
31
-
32
-
33
-
34
-
35
-
36
-
37
-
38
-
39
-
40
 |
 |