HP DesignJet Z2000 Assembly Instructions
HP DesignJet Z2000 Manual
 |
View all HP DesignJet Z2000 manuals
Add to My Manuals
Save this manual to your list of manuals |
HP DesignJet Z2000 manual content summary:
- HP DesignJet Z2000 | Assembly Instructions - Page 1
HP DesignJet Z2600 PostScript® Printer EENN Product Assembly Instructions FR Instructions d'assemblage du produit DE Anleitung zur Produktmontage IT Istruzioni per l'installazione del prodotto ES Instrucciones de montaje del producto PT Instruções de montagem do - HP DesignJet Z2000 | Assembly Instructions - Page 2
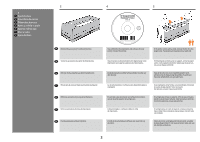
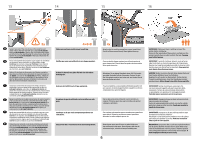
1 EN Read these instructions carefully...What you will need for this procedure • will also need a roll of 24 in (minimum) paper, in order to align the printheads • You will need a LAN connection near in order to connect your printer to the internet. FR Lisez ces consignes avec attention... - HP DesignJet Z2000 | Assembly Instructions - Page 3
Open de doos 3 4 5 HP DesignJet Z2600 PostScript® Printer Start Up EN Remove the accessories from the printer box. FR Sortez les accessoires U vindt de documentatie en software voor uw printer op de printer. Si l'imprimante est livrée avec un support, retirez le grand carton. Cette opération - HP DesignJet Z2000 | Assembly Instructions - Page 4
straps around the stand box. Do not remove the white protective material until instructed to do so. IMPORTANT: Make sure ther is nothing on top of the printer before continuing. Coupez et retirez les sangles entourant le carton du support. Ne retirez pas le matériel de protection blanc tant que vous - HP DesignJet Z2000 | Assembly Instructions - Page 5
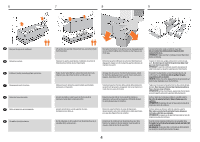
con soporte) PT Conjunto do suporte (somente impressoras com suporte) NL Montage van de stand (alleen EN Open the stand box. printer met stand) FR Ouvrez le carton du support. DE Öffnen Sie die Verpackung des Standfußes. IT Aprire la scatola del piedistallo. ES Abra la caja del soporte. PT - HP DesignJet Z2000 | Assembly Instructions - Page 6
on the inside. FR Posez une extrémité de la traverse sur le support et assemblez un montant à l'autre extrémité, en utilisant deux vis sur volledig vast. 6 IMPORTANT: Make sure there is nothing on top of the printer before continuing. Return to the main body of the product, carefully turn the - HP DesignJet Z2000 | Assembly Instructions - Page 7
transparent qui protège le produit. Ouvrez le couvercle transparent et retirez le sachet déshydratant du haut du produit. Relevez le support, en le laissant à l'envers. Entfernen Sie das Klebeband von der durchsichtigen Schutzfolie des Produkts. Öffnen Sie die transparente Abdeckung, und - HP DesignJet Z2000 | Assembly Instructions - Page 8
the legs fit into the corresponding holes in the product. Notice that the product body is upside down. Placez doucement et avec précaution le support sur le produit, en faisant en sorte que les boutons de couleur des montants correspondent aux trous dans le produit. Vous remarquerez que la partie - HP DesignJet Z2000 | Assembly Instructions - Page 9
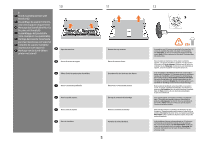
. Faites pivoter le produit à 90 degrés. IMPORTANT : vérifiez que les supports d'impression se trouvent face vers le bas. DE Stellen Sie sicher, dass baixo. NL Zorg ervoor dat er zich niets op de bovenkant van de printer bevindt. Draai het product 90 graden. BELANGRIJK: zorg ervoor dat de - HP DesignJet Z2000 | Assembly Instructions - Page 10
devez entendre un clic lorsque le tube se met en place. Fixez le tube avant du bac de réception aux deux petits tubes de chaque support. Befestigen Sie jede der beiden kurzen Streben an der Vorderseite von jedem Fuss. Die Streben rasten ein, wenn sie richtig sitzen. Schieben Sie die vordere - HP DesignJet Z2000 | Assembly Instructions - Page 11
leg of the stand. The basket is now complete. FR Posez le tube arrière du bac de réception sur les supports que vous venez de fixer à chaque montant du support. L'installation du bac de réception est maintenant terminée. DE Setzen Sie die hintere Stange der Ablage in die Halterungen ein, die - HP DesignJet Z2000 | Assembly Instructions - Page 12
kartonnen steun zien die met tape aan het product bevestigd is. Verwijder de tape. Draai de kartonnen steun 90° naar rechts. Carefully lift the cardboard support up and out of the product. It will not be needed again; you can discard it. Relevez et sortez le - HP DesignJet Z2000 | Assembly Instructions - Page 13
40 41 EN Inside the right-hand side of the product, you will see a piece of cardboard. Remove the cardboard carefully. Note: It can be discarded as it will not be required again. FR À l'intérieur, sur le côté droit du produit, se trouve un morceau de carton. Retirez le carton avec précaution. - HP DesignJet Z2000 | Assembly Instructions - Page 14
clip, om per ongeluk uitpluggen te vermijden. If you find a USB flash drive in a plastic bag inside the box, it contains the latest Firmware. Please follow the instructions in the bag. Otherwise, please ignore this step. * The USB drive is only needed in some products. Vous trouverez peut-être un - HP DesignJet Z2000 | Assembly Instructions - Page 15
instructions. FR Sur le panneau avant, le logo HP HP-logo verschijnt op het voorpaneel. Gelieve even te wachten. Vervolgens wordt u gevraagd om de taal van het product te selecteren. Indien de usb-flashaandrijving is gevonden, volg de instructies op het voorpaneel. 5 EN Printhead and cartridge - HP DesignJet Z2000 | Assembly Instructions - Page 16
il coperchio sulla parte sinistra del prodotto . Insert the ink cartridges one by one. Each cartridge is marked with its own color, and should be inserted solo nell'alloggiamento dello stesso colore. Non toccare i pioli, le guide o i circuiti. Abra la cubierta del lado izquierdo del producto. - HP DesignJet Z2000 | Assembly Instructions - Page 17
ink cartridges correctly, the product must prepare the ink system for its first use. It will do this immediately if you press the OK key, or after a 60-second pause if you do not press the OK key. When the ink and grasp the blue handle of the printhead cover. Pull the blue handle towards you - HP DesignJet Z2000 | Assembly Instructions - Page 18
EN The setup printheads exist only to prevent the escape of ink during ink cartridge installation. The front panel now prompts you to remove the setup printheads and press the inchiostro, che potrebbe fuoriuscire. Non toccare i pioli, le guide o i circuiti. Extraiga y deseche todos los cabezales de - HP DesignJet Z2000 | Assembly Instructions - Page 19
, door de vergrendeling op te pakken. 19 Push the handle down on top of the printhead cover. The product checks and prepares the new printheads, which may take 30 to 40 minutes depending on the condition of the printheads and of the environment. Close the cover. Poussez la poignée vers le bas sur - HP DesignJet Z2000 | Assembly Instructions - Page 20
66 HP DesignJet Z2600 PostScript® Printer Start Up 67 68 © Copyright 2016 HP Development Company, L.P. EN While the product is preparing the printheads, you could spend the time installing the product software on your computer. Be sure to follow the software installation instructions. - HP DesignJet Z2000 | Assembly Instructions - Page 21
sure to put it on the right way round: the leading edge of the paper should go into the product from the top of the roll. Add the removable roll as far as it will go. No gap should be left between stop and paper. From the front of the product, place the spindle into the product. Poussez au - HP DesignJet Z2000 | Assembly Instructions - Page 22
correctly connected to the Internet. 2 - Enable Web Services during initial setup of the printer, or later following the instructions in the front panel. The printer may need to restart if the firmware has updated. FR HP ePrint : impression par e-mail 1 - Vérifiez que l'imprimante est correctement - HP DesignJet Z2000 | Assembly Instructions - Page 23
, indien volledig, druk op "OK". Congratulations! HP ePrint is enabled on your printer. Félicitations ! HP ePrint est activé sur votre imprimante. Herzlichen Glückwunsch! HP ePrint ist auf Ihrem Drucker aktiviert. Congratulazioni! HP ePrint è stato abilitato sulla stampante. ¡Felicidades - HP DesignJet Z2000 | Assembly Instructions - Page 24
80 HP DesignJet Z2600 PostScript® Printer Start Up 81 © Copyright 2016 HP Development Company, L.P. hp.com/go/DesignJetclick EN Install the product software from the DVD that came with your printer onto your computer. Be sure to follow the software installation instructions. For USB connections - HP DesignJet Z2000 | Assembly Instructions - Page 25
82 83 1 3 2 4 EN You can now, or at some later time, color-calibrate the paper type that you intend to use in the product. Color calibration is recommended for accurate color printing. It can be started from the Product Utility - HP DesignJet Z2000 | Assembly Instructions - Page 26
yet. You must first install the product driver software on the computer. Insert the HP Start Up Kit DVD into your computer. HP DesignJet Installer icon and follow the instructions on your screen. NOTE: If the installation failed, reinstall the software from: http://www.hp.com/go/Z2600/support - HP DesignJet Z2000 | Assembly Instructions - Page 27
ícone DVD em sua área de trabalho. * Abra o ícone Instalador da HP DesignJet para Mac OS X e siga as instruções que aparecem na tela. OBSERVAÇÃO: Se a instalação falhar, reinicie o software por: http://www.hp.com/go/Z2600/support NL Opmerking voor usb-verbinding met Mac & Windows: Sluit de computer - HP DesignJet Z2000 | Assembly Instructions - Page 28
de ce document sont susceptibles d'être modifiées sans préavis. Les garanties des produits et services HP sont exclusivement présentées dans la documentation accompagnant ces produits et services. Rien dans le présent document ne peut être considéré comme constituant une garantie supplémentaire
-
 1
1 -
 2
2 -
 3
3 -
 4
4 -
 5
5 -
 6
6 -
 7
7 -
8
-
9
-
10
-
11
-
12
-
13
-
14
-
15
-
16
-
17
-
18
-
19
-
20
-
21
-
22
-
23
-
24
-
25
-
26
-
27
-
28
 |
 |

© Copyright 2016 HP Development Company, L.P.
Large Format Division
Camí de Can Graells 1-21 · 08174
Sant Cugat del Vallès
Barcelona · Spain
All rights reserved
Printed in XXX
EN
EN
ES
DE
FR
PT
NL
IT
EN
ES
DE
FR
PT
NL
IT
Hardware Setup:
1- open the printer box
2- Stand assembly
3- Unpack more components
4- Power and network configuration
5- Printhead and cartridge setup
Software setup:
Now, it’s easy to print large-format documents from virtually
anywhere, using your laptop, printer touchscreen, iPhone®, or
iPad®.
Installation du matériel :
1- Ouverture du carton de l’imprimante
2- Assemblage du support
3- Déballage des autres composants
4- Configuration réseau et alimentation
5- Installation des têtes d’impression et des cartouches
Installation du logiciel :
Il est désormais facile d’imprimer des documents grand
format depuis quasiment n’importe où à l’aide d’un ordinateur
portable, de l’écran tactile de l’imprimante, d’un iPhone® ou
d’un iPad®.
Hardware-Setup:
1: Öffnen des Druckerkartons
2: Zusammenbauen des Standfußes
3: Auspacken weiterer Komponenten
4: Stromversorgungs- und Netzwerkkonfiguration
5: Einrichten von Druckköpfen und Patronen
Software-Setup:
Das Drucken großformatiger Dokumente von nahezu jedem
Standort aus mit Ihrem Notebook, Drucker-Touchscreen,
iPhone® oder iPad® ist nun einfacher denn je.
Installazione dell’hardware:
1 - Apertura della scatola della stampante
2 - Assemblaggio del piedistallo
3 - Disimballaggio di altri componenti
4 - Configurazione dell’alimentazione e della rete
5 - Installazione delle cartucce e delle testine di stampa
Impostazione del software:
Ora è semplice stampare documenti di grande formato da
praticamente qualsiasi posizione utilizzando il laptop, lo
schermo a sfioramento della stampante, l’iPhone® o l’iPad®.
Instalación del hardware:
1- Apertura de la caja de la impresora
2- Montaje del soporte
3- Desembalaje de más componentes
4- Configuración de red y alimentación
5- Instalación del cabezal de impresión y el cartucho
Instalación del software:
Ahora resulta muy fácil imprimir documentos de gran formato
desde prácticamente cualquier lugar mediante un portátil, la
pantalla táctil de la impresora, un iPhone® o un iPad®.
Configuração de hardware:
1- Abra a caixa da impressora
2 - Levante a montagem
3 - Retire mais componentes da embalagem
4 - Configuração de rede e energia
5 - Configuração de cartucho de tinta e cabeçotes de impressão
Configuração de software:
Agora, é fácil imprimir documentos em grandes formatos de
praticamente qualquer lugar usando olaptop, a tela sensível ao
toque da impressora, o iPhone® ou o iPad®.
Installatie van de hardware:
1- Open de printerdoos
2- Montagestand
3- Haal de andere onderdelen uit de verpakking
4- Stroom- en netwerkconfiguratie
5- Installatie van printkop en cartridge
Installatie van de software:
Nu kunt u eenvoudig documenten van groot formaat vanaf
vrijwel elke locatie af te drukken, met behulp van uw laptop,
uw printertouchscreen, iPhone® of iPad®.
HP DesignJet Z2600
PostScript® Printer
Product Assembly
Instructions
Instructions d’assemblage
du produit
Anleitung zur
Produktmontage
Istruzioni per
l’installazione del prodotto
Instrucciones de montaje
del producto
Instruções de montagem
do produto
Produkt montage-instructies
EN
ES
DE
FR
PT
NL
IT
*T0B52-90004*
T0B52-90004
EN
ES
DE
FR
PT
NL
IT
Hardware Setup:
1- open the printer box
2- Stand assembly
3- Unpack more components
4- Power and network configuration
5- Printhead and cartridge setup
Software setup:
Now, it’s easy to print large-format documents from virtually
anywhere, using your laptop, printer touchscreen, iPhone®, or
iPad®.
Installation du matériel :
1- Ouverture du carton de l’imprimante
2- Assemblage du support
3- Déballage des autres composants
4- Configuration réseau et alimentation
5- Installation des têtes d’impression et des cartouches
Installation du logiciel :
Il est désormais facile d’imprimer des documents grand
format depuis quasiment n’importe où à l’aide d’un ordinateur
portable, de l’écran tactile de l’imprimante, d’un iPhone® ou
d’un iPad®.
Hardware-Setup:
1: Öffnen des Druckerkartons
2: Zusammenbauen des Standfußes
3: Auspacken weiterer Komponenten
4: Stromversorgungs- und Netzwerkkonfiguration
5: Einrichten von Druckköpfen und Patronen
Software-Setup:
Das Drucken großformatiger Dokumente von nahezu jedem
Standort aus mit Ihrem Notebook, Drucker-Touchscreen,
iPhone® oder iPad® ist nun einfacher denn je.
Installazione dell’hardware:
1 - Apertura della scatola della stampante
2 - Assemblaggio del piedistallo
3 - Disimballaggio di altri componenti
4 - Configurazione dell’alimentazione e della rete
5 - Installazione delle cartucce e delle testine di stampa
Impostazione del software:
Ora è semplice stampare documenti di grande formato da
praticamente qualsiasi posizione utilizzando il laptop, lo
schermo a sfioramento della stampante, l’iPhone® o l’iPad®.
Instalación del hardware:
1- Apertura de la caja de la impresora
2- Montaje del soporte
3- Desembalaje de más componentes
4- Configuración de red y alimentación
5- Instalación del cabezal de impresión y el cartucho
Instalación del software:
Ahora resulta muy fácil imprimir documentos de gran formato
desde prácticamente cualquier lugar mediante un portátil, la
pantalla táctil de la impresora, un iPhone® o un iPad®.
Configuração de hardware:
1- Abra a caixa da impressora
2 - Levante a montagem
3 - Retire mais componentes da embalagem
4 - Configuração de rede e energia
5 - Configuração de cartucho de tinta e cabeçotes de impressão
Configuração de software:
Agora, é fácil imprimir documentos em grandes formatos de
praticamente qualquer lugar usando olaptop, a tela sensível ao
toque da impressora, o iPhone® ou o iPad®.
Installatie van de hardware:
1- Open de printerdoos
2- Montagestand
3- Haal de andere onderdelen uit de verpakking
4- Stroom- en netwerkconfiguratie
5- Installatie van printkop en cartridge
Installatie van de software:
Nu kunt u eenvoudig documenten van groot formaat vanaf
vrijwel elke locatie af te drukken, met behulp van uw laptop,
uw printertouchscreen, iPhone® of iPad®.
1