HP Designjet T2300 HP Designjet T2300 eMFP - Assembly Instructions: English - Page 3

Schraubendreher und 22 Schrauben. 16 Schrauben

Page 3 highlights

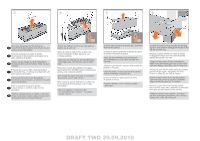
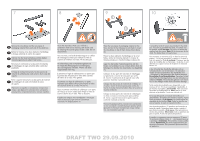
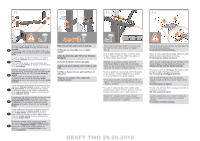
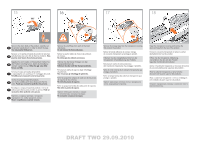
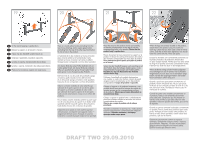
7 8 9 10 1 2 Remove the cross-brace and the two pieces of EN packaging material from each end of the stand box. FR Retirez la traverse et les deux éléments d'emballage à chaque extrémité du carton du support. DE Nehmen Sie die Querverstrebung und die beiden Verpackungsstücke an jedem Ende heraus. Rimuovere il controvento e le due parti di materiale IT di imballaggio da ogni estremità della scatola del piedistallo. Extraiga el anclaje transversal y las dos piezas de ES material de embalaje de cada extremo de la caja del soporte. Retire o suporte transversal e as duas partes de material PT da embalagem de cada extremidade da caixa do suporte. RU Go to the stand box. Note: you will find a calibration sheet and a cleaning cloth (to be used for cleaning the scanner glass) inside a tube. Do not discard them. Vous trouverez une feuille d'étalonnage et un chiffon de nettoyage (à utiliser pour nettoyer la vitre du scanner) à l'intérieur d'un tube. Ne les jetez pas. Im Lieferumfang sind ein Kalibrierungsblatt und ein verpacktes Reinigungstuch (zur Reinigung des Scannerglases) enthalten. Werfen Sie diese Gegenstände nicht weg. È presente un foglio di calibrazione e un panno per la pulizia (da utilizzare per il vetro dello scanner) all'interno di un tubo. Non gettarli. Encontrará una hoja de calibración y un paño limpiador (que deberá utilizar para limpiar el vidrio del escáner) dentro de un tubo. No los tire. Você encontrará uma folha de calibração e um pano de limpeza (a serem usados para limpar o vidro do scanner) dentro de um tubo. Não os descarte. Place the two pieces of packaging material on the floor, and slot in the 3rd piece to join them (1). Insert the cross-brace on top of them where shown above (2). Placez les deux éléments d'emballage sur le sol et faites-y rentrer le troisième élément (1). Insérez la traverse par-dessus à l'endroit indiqué ci-dessus (2). Legen Sie die beiden Verpackungsstücke auf den Boden und verbinden Sie sie mit dem dritten Stück (1). Befestigen Sie darüber die Querstrebe wie abgebildet (2). Collocare le due parti del materiale di imballaggio sul pavimento e inserire la terza parte per unirle (1). Inserire il controvento al di sopra di esse nella posizione mostrata in precedenza (2). Coloque las dos piezas de material de embalaje en el suelo e inserte la tercera pieza para unirlas (1). Inserte el anclaje transversal sobre ellas, tal y como se muestra arriba (2). Coloque as duas partes de material de embalagem no chão e encaixe a terceira parte para juntá-las (1). Insira o suporte transversal na parte superior, conforme mostrado acima (2). 1 2). 22x A screwdriver and 22 screws are provided in the stand box: 16 screws to assemble the stand, 4 to attach it to the product, and 2 are spare. Do not try to remove the washers from the screws. Note: All the screws are for the stand. The basket does not need screws. Vous trouverez un tournevis et 22 vis dans le carton du support : 16 vis pour assembler le support, 4 vis pour le fixer à le produit et 2 vis de rechange. N'essayez pas de retirer les rondelles des vis. Remarque : toutes les vis sont destinées au support. Le bac de réception ne nécessite aucune vis. In der Schachtel des Standfußes befinden sich ein Schraubendreher und 22 Schrauben. 16 Schrauben werden für den Zusammenbau des Standfußes und 4 Schrauben für die Befestigung des Produkts benötigt. Die restlichen 2 sind Ersatzschrauben. Versuchen Sie auf keinen Fall, die Unterlegscheiben von den Schrauben zu entfernen. Hinweis: Alle Schrauben gehören zum Standfuß. Für die Ablage werden keine Schrauben benötigt. Nella scatola del piedistallo sono disponibili un cacciavite e 22 viti: 16 viti per assemblare il piedistallo, 4 per fissarlo al prodotto e 2 di ricambio. Non cercare di rimuovere le rondelle dalle viti. Nota: tutte le viti sono destinate al piedistallo. Il cesto non richiede viti. En la caja del soporte, se incluyen 22 tornillos y un destornillador: 16 tornillos para montar el soporte, 4 para fijarlo al producto y 2 de repuesto. No intente retirar las arandelas de los tornillos. Nota: Todos los tornillos son para el soporte. La cesta no necesita tornillos. Uma chave de parafuso e 22 parafusos são fornecidos na caixa do suporte: 16 parafusos para montar o suporte, 4 para fixá-lo no produto e 2 de reserva. Não tente retirar as arruelas dos parafusos. Observação: todos os parafusos são para o suporte. A cesta não precisa de parafusos. 22 16 4 2 DRAFT TWO 29.09.2010

  • 1
  • 2
  • 3
  • 4
  • 5
  • 6
  • 7
  • 8
  • 9
  • 10
  • 11
  • 12
  • 13
  • 14
  • 15
  • 16
  • 17
  • 18
  • 19
  • 20
  • 21
  • 22
  • 23
  • 24
  • 25
  • 26

1
2
22x
EN
FR
IT
ES
PT
RU
DE
Go to the stand box. Note: you will find a
calibration sheet and a cleaning cloth (to be used
for cleaning the scanner glass) inside a tube. Do not
discard them.
Vous trouverez une feuille d’étalonnage et un chiffon
de nettoyage (à utiliser pour nettoyer la vitre du
scanner) à l’intérieur d’un tube. Ne les jetez pas.
Im Lieferumfang sind ein Kalibrierungsblatt und
ein verpacktes Reinigungstuch (zur Reinigung
des Scannerglases) enthalten. Werfen Sie diese
Gegenstände nicht weg.
È presente un foglio di calibrazione e un panno per
la pulizia (da utilizzare per il vetro dello scanner)
all’interno di un tubo. Non gettarli.
Encontrará una hoja de calibración y un paño
limpiador (que deberá utilizar para limpiar el vidrio
del escáner) dentro de un tubo. No los tire.
Você encontrará uma folha de calibração e um pano
de limpeza (a serem usados para limpar o vidro do
scanner) dentro de um tubo. Não os descarte.
В трубке вы найдете лист калибровки и чистящую
ткань (используется для очистки стеклянных
стаканов). Не выбрасывайте их.
Remove the cross-brace and the two pieces of
packaging material from each end of the stand box.
Retirez la traverse et les deux éléments d’emballage
à chaque extrémité du carton du support.
Nehmen Sie die Querverstrebung und die beiden
Verpackungsstücke an jedem Ende heraus.
Rimuovere il controvento e le due parti di materiale
di imballaggio da ogni estremità della scatola del
piedistallo.
Extraiga el anclaje transversal y las dos piezas de
material de embalaje de cada extremo de la caja del
soporte.
Retire o suporte transversal e as duas partes de material
da embalagem de cada extremidade da caixa
do suporte.
Извлеките из коробки с основанием поперечную
опору и два фрагмента упаковочного материала,
размещенных в противоположных концах коробки.
Place the two pieces of packaging material on the
floor, and slot in the 3rd piece to join them (1). Insert
the cross-brace on top of them where shown above
(2).
Placez les deux éléments d’emballage sur le sol et
faites-y rentrer le troisième élément (1). Insérez la
traverse par-dessus à l’endroit indiqué ci-dessus (2).
Legen Sie die beiden Verpackungsstücke auf den
Boden und verbinden Sie sie mit dem dritten Stück (1).
Befestigen Sie darüber die Querstrebe wie abgebildet
(2).
Collocare le due parti del materiale di imballaggio
sul pavimento e inserire la terza parte per unirle
(1). Inserire il controvento al di sopra di esse nella
posizione mostrata in precedenza (2).
Coloque las dos piezas de material de embalaje en
el suelo e inserte la tercera pieza para unirlas (1).
Inserte el anclaje transversal sobre ellas, tal y como se
muestra arriba (2).
Coloque as duas partes de material de embalagem
no chão e encaixe a terceira parte para juntá-las
(1). Insira o suporte transversal na parte superior,
conforme mostrado acima (2).
Положите два фрагмента упаковочного материала
на пол и вставьте в соответствующий разъем третий
фрагмент (1). Вставьте поперечную опору поверх
них, как показано выше (2).
A screwdriver and 22 screws are provided in the stand
box: 16 screws to assemble the stand, 4 to attach it to
the product, and
2 are spare
. Do not try to remove the
washers from the screws.
Note:
All the screws are for the
stand. The basket does not need screws.
Vous trouverez un tournevis et 22 vis dans le carton du
support : 16 vis pour assembler le support, 4 vis pour le
fixer à le produit et
2 vis de rechange
. N’essayez pas de
retirer les rondelles des vis. Remarque : toutes les vis sont
destinées au support. Le bac de réception ne nécessite
aucune vis.
In der Schachtel des Standfußes befinden sich ein
Schraubendreher und 22 Schrauben. 16 Schrauben
werden für den Zusammenbau des Standfußes und
4 Schrauben für die Befestigung des Produkts benötigt.
Die restlichen 2 sind Ersatzschrauben.
Versuchen Sie auf
keinen Fall, die Unterlegscheiben von den Schrauben zu
entfernen.
Hinweis:
Alle Schrauben gehören zum Stand
-
fuß. Für die Ablage werden keine Schrauben benötigt.
Nella scatola del piedistallo sono disponibili un cac
-
ciavite e 22 viti: 16 viti per assemblare il piedistallo, 4
per fissarlo al prodotto e
2 di ricambio
. Non cercare di
rimuovere le rondelle dalle viti.
Nota:
tutte le viti sono
destinate al piedistallo. Il cesto non richiede viti.
En la caja del soporte, se incluyen 22 tornillos y un
destornillador: 16 tornillos para montar el soporte, 4 para
fijarlo al producto y
2 de repuesto
. No intente retirar las
arandelas de los tornillos.
Nota:
Todos los tornillos son
para el soporte. La cesta no necesita tornillos.
Uma chave de parafuso e 22 parafusos são fornecidos na
caixa do suporte: 16 parafusos para montar o suporte, 4
para fixá-lo no produto e
2 de reserva
. Não tente retirar as
arruelas dos parafusos.
Observação:
todos os parafusos são
para o suporte. A cesta não precisa de parafusos.
В коробке с основанием имеется отвертка и 22 винта:
16 винтов для сборки стойки, 4 — для прикрепления ее
к принтеру и
2 запасных
. Не пытайтесь снимать шайбы
с винтов.
Примечание.
Все винты предназначены для
крепления основания. Для установки приемника винты
не требуются.
8
7
10
9
DRAFT TWO 29.09.2010