HP ENVY Photo 7800 User Guide - Page 47
Print on Both Sides Manually, Print in Max DPI
 |
View all HP ENVY Photo 7800 manuals
Add to My Manuals
Save this manual to your list of manuals |
Page 47 highlights
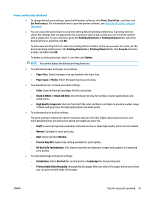
Printer settings tips (Windows) ● To change default print settings, open the HP printer software, click Print, Scan & Fax , and then click Set Preferences. For information how to open the printer software, see Open the HP printer software (Windows). ● You can use printing shortcuts to save time setting desired printing preferences. A printing shortcut stores the settings that are appropriate for a particular type of job, so that you can set all the options with a single click. To use a shortcut, go to the Printing Shortcuts or Printing Shortcut tab, select the desired shortcut, and then click OK. To add a new printing shortcut, select an existing shortcut similar to the one you want to create, set the desired printing preferences in the Printing Shortcuts or Printing Shortcut tab, click Save As and enter a name, and then click OK. To delete a printing shortcut, select it, and then click Delete. NOTE: You cannot delete the default printing shortcuts. ● To understand paper and paper tray settings: - Paper Size: Select the paper size you loaded in the input tray. - Paper type or Media: Select the paper type you are using. ● To understand color or black and white settings: - Color: Uses ink from all cartridges for full color prints. - Black & White or Black Ink Only: Uses the black ink only for normal or lower quality black and white prints. - High Quality Grayscale: Uses ink from both the color and black cartridges to produce a wider range of black and grey tones for high quality black and white prints. ● To understand print quality settings: The print quality is measured in print resolution dots per inch (dpi). Higher dpi produces clearer and more detailed prints, but slows print speed and might use more ink. - Draft: Lowest dpi typically used when ink levels are low or when high quality prints are not needed. - Normal: Suitable for most print jobs. - Best: Better dpi than Normal. - Print in Max DPI: Highest dpi setting available for print quality. - HP Real Life Technologies: This feature smooths and sharpens images and graphics for improved print quality. ● To understand page and layout settings: - Orientation: Select Portrait for vertical prints or Landscape for horizontal prints. - Print on Both Sides Manually: Manually flip the pages after one side of the paper prints out so that you can print on both sides of the paper. ENWW Tips for successful printing 41
-
 1
1 -
2
-
3
-
4
-
5
-
6
-
7
-
8
-
9
-
10
-
11
-
12
-
13
-
14
-
15
-
16
-
17
-
18
-
19
-
20
-
21
-
22
-
23
-
24
-
25
-
26
-
27
-
28
-
29
-
30
-
31
-
32
-
33
-
34
-
35
-
36
-
37
-
38
-
39
-
40
-
41
-
 42
42 -
 43
43 -
 44
44 -
 45
45 -
 46
46 -
 47
47 -
 48
48 -
 49
49 -
 50
50 -
 51
51 -
 52
52 -
53
-
54
-
55
-
56
-
57
-
58
-
59
-
60
-
61
-
62
-
63
-
64
-
65
-
66
-
67
-
68
-
69
-
70
-
71
-
72
-
73
-
74
-
75
-
76
-
77
-
78
-
79
-
80
-
81
-
82
-
83
-
84
-
85
-
86
-
87
-
88
-
89
-
90
-
91
-
92
-
93
-
94
-
95
-
96
-
97
-
98
-
99
-
100
-
101
-
102
-
103
-
104
-
105
-
106
-
107
-
108
-
109
-
110
-
111
-
112
-
113
-
114
-
115
-
116
-
117
-
118
-
119
-
120
-
121
-
122
-
123
-
124
-
125
-
126
-
127
-
128
-
129
-
130
-
131
-
132
-
133
-
134
-
135
-
136
-
137
-
138
-
139
-
140
-
141
-
142
-
143
-
144
-
145
-
146
-
147
-
148
-
149
-
150
-
151
-
152
-
153
-
154
-
155
-
156
-
157
-
158
-
159
-
160
-
161
-
162
-
163
-
164
-
165
-
166
-
167
-
168
-
169
-
170
-
171
-
172
-
173
-
174
-
175
-
176
-
177
-
178
-
179
-
180
-
181
-
182
-
183
-
184
-
185
-
186
-
187
-
188
-
189
-
190
-
191
-
192
-
193
-
194
-
195
-
196
-
197
-
198
-
199
-
200
-
201
-
202
-
203
 |
 |
