HP L7580 Setup Guide - Page 11
Control panel, Speed Dial, Keypad, Display - no scan options
 |
UPC - 882780620650
View all HP L7580 manuals
Add to My Manuals
Save this manual to your list of manuals |
Page 11 highlights
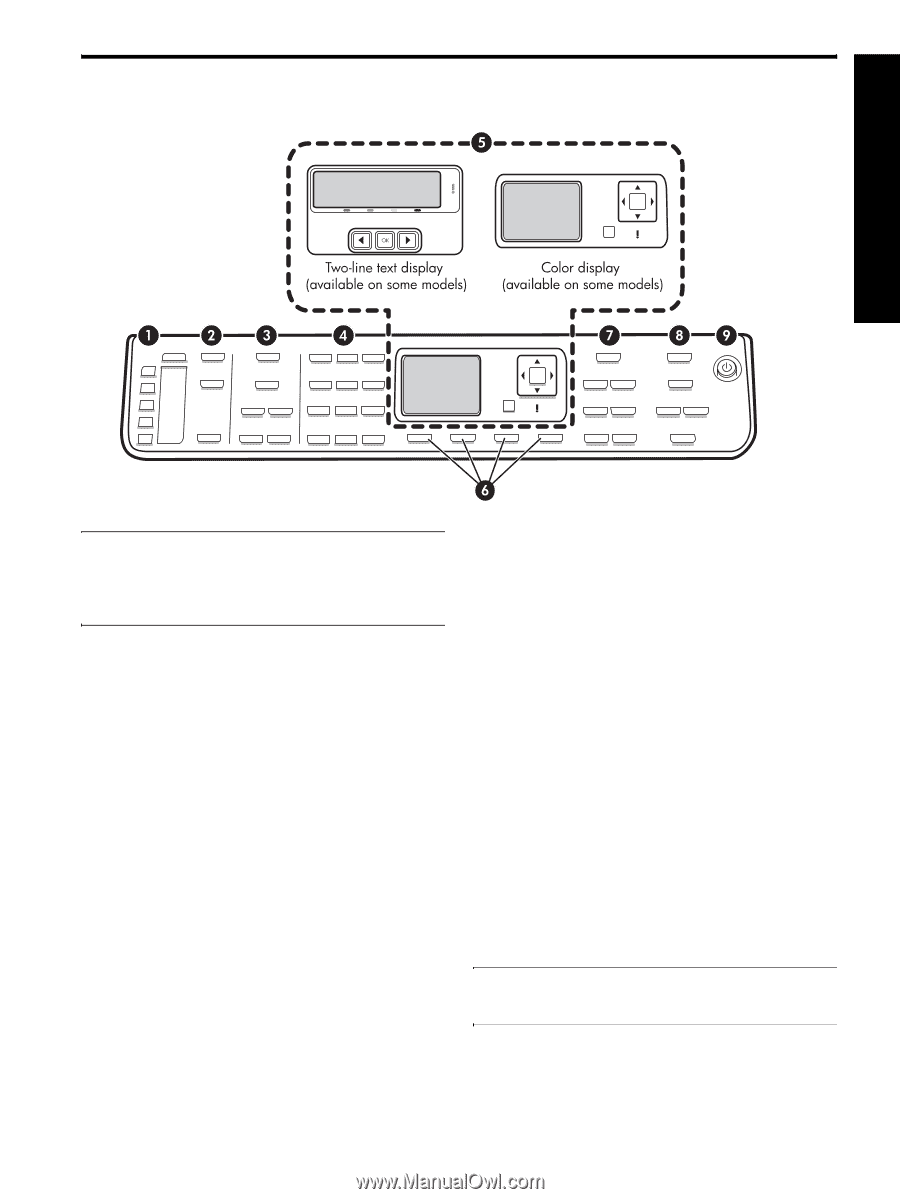
Control panel English NOTE: The control panel layout and features vary depending on the model of the device that you have. Your device might not have all of the buttons and lights described in this section. 1 Speed Dial Speed-dial buttons: Access the first five speed-dial numbers. An entry might be a fax number or a group of fax numbers, or a folder on the network. List of speed-dial entries: Identify the speed-dial entries that correspond to the five speed-dial buttons. You can write the entries on the lined paper that is provided, or print lists to insert. 2 SCAN Scan Menu: Select a scan destination. Digital Filing: Open the Direct Digital Filing speed-dial address book to select a destination for the scan. START SCAN: Start a scan job and send it to the destination you selected using the Scan Menu button. Junk Fax Blocker: Open the Junk Fax Blocker menu where you can add or delete numbers from a list of blocked fax numbers and view reports. This feature is available only if caller ID is set up through your phone company. Resolution: Adjust the speed and quality of faxes that are sent from the device. Redial/Pause: Redial the most recently dialed fax number. Auto Answer: Set the fax function to answer the phone automatically after a specified number of rings. START FAX Black or START FAX Color: Start the fax, in black and white or in color. 4 Keypad Enter fax numbers, values, or text. 5 Display NOTE: Some device models have a two-line display and some models have a color display. 3 FAX Menu: Open the menu for the fax function. Shows status and error messages, mode and setup menus and their options, help information, and ink cartridge levels. Control panel 7
-
 1
1 -
2
-
3
-
4
-
5
-
 6
6 -
 7
7 -
 8
8 -
 9
9 -
 10
10 -
 11
11 -
 12
12 -
 13
13 -
 14
14 -
 15
15 -
 16
16 -
17
-
18
-
19
-
20
-
21
-
22
-
23
-
24
-
25
-
26
-
27
-
28
-
29
-
30
-
31
-
32
-
33
-
34
-
35
-
36
-
37
-
38
-
39
-
40
-
41
-
42
-
43
-
44
-
45
-
46
-
47
-
48
-
49
-
50
-
51
-
52
-
53
-
54
-
55
-
56
-
57
-
58
-
59
-
60
-
61
-
62
-
63
-
64
-
65
-
66
-
67
-
68
-
69
-
70
-
71
-
72
-
73
-
74
-
75
-
76
-
77
-
78
-
79
-
80
-
81
-
82
-
83
-
84
-
85
-
86
-
87
-
88
-
89
-
90
-
91
-
92
-
93
-
94
-
95
-
96
-
97
-
98
-
99
-
100
-
101
-
102
-
103
-
104
-
105
-
106
-
107
-
108
-
109
-
110
-
111
-
112
-
113
-
114
-
115
-
116
-
117
-
118
-
119
-
120
-
121
-
122
-
123
-
124
-
125
-
126
-
127
-
128
-
129
-
130
-
131
-
132
-
133
-
134
-
135
-
136
 |
 |