HP L7580 Setup Guide - Page 12
Other buttons, PHOTO, Power button and lights, Number Of Copies - wireless
 |
UPC - 882780620650
View all HP L7580 manuals
Add to My Manuals
Save this manual to your list of manuals |
Page 12 highlights
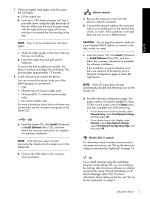
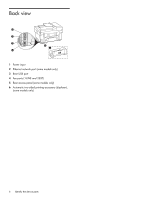
Arrow buttons: Move through menu options or through photos on the color display (if available). OK: Select a menu, setting, or if the device has a color display, select photos for printing. Back: Return to the previous menu. 6 Other buttons Setup: Access the menu system for reports, settings, and maintenance. 2-sided: Select two-sided output (if a duplexer is installed). Help: Shows additional information about messages or menus that are shown on the display. For hardware problems, shows a message that explains the problem. If the device does not have a Help button, use the Setup button to access the help. Cancel: Stop a job, exit a menu, or exit settings. 9 Power button and lights Power button: Turn the device on or off. When the device is off, a minimal amount of power is still supplied to the device. To completely disconnect the power supply to the device, turn the device off, and then unplug the power cord. When lit, indicates that the device is on. The light blinks while performing a job. Network status light: Indicate the status of the device on a network. Wireless (802.11) status light: Indicate the status of the device on a wireless network. Attention light: When blinking, the attention light indicates an error has occurred that requires your attention. 7 COPY Menu: Open the menu for the copy function. Reduce/Enlarge: Change the size of the copy. Number Of Copies: Select the number of copies using either the arrow keys or by entering the number directly using the keypad. Collate: Sequence copied output in the exact order it is scanned from the scanner glass or ADF. Quality: Control the speed and quality of copies. The Quality light illuminates next to the selected copy quality. START COPY Black or START COPY Color: Start the copy in black and white or in color. 8 PHOTO Menu: Open the menu for the photo function. Proof Sheet: Print a proof sheet when a memory card has been inserted in a memory card slot. Rotate: If the device has a color display, rotate the currently displayed photo 90 degrees. Subsequent presses continue to rotate the photo 90 degrees. Zoom (- and +): If the device has a color display, enlarge or reduce the image. PRINT PHOTOS: Start the photo printing job. 8 Identify the device parts
-
 1
1 -
2
-
3
-
4
-
5
-
6
-
 7
7 -
 8
8 -
 9
9 -
 10
10 -
 11
11 -
 12
12 -
 13
13 -
 14
14 -
 15
15 -
 16
16 -
 17
17 -
18
-
19
-
20
-
21
-
22
-
23
-
24
-
25
-
26
-
27
-
28
-
29
-
30
-
31
-
32
-
33
-
34
-
35
-
36
-
37
-
38
-
39
-
40
-
41
-
42
-
43
-
44
-
45
-
46
-
47
-
48
-
49
-
50
-
51
-
52
-
53
-
54
-
55
-
56
-
57
-
58
-
59
-
60
-
61
-
62
-
63
-
64
-
65
-
66
-
67
-
68
-
69
-
70
-
71
-
72
-
73
-
74
-
75
-
76
-
77
-
78
-
79
-
80
-
81
-
82
-
83
-
84
-
85
-
86
-
87
-
88
-
89
-
90
-
91
-
92
-
93
-
94
-
95
-
96
-
97
-
98
-
99
-
100
-
101
-
102
-
103
-
104
-
105
-
106
-
107
-
108
-
109
-
110
-
111
-
112
-
113
-
114
-
115
-
116
-
117
-
118
-
119
-
120
-
121
-
122
-
123
-
124
-
125
-
126
-
127
-
128
-
129
-
130
-
131
-
132
-
133
-
134
-
135
-
136
 |
 |