HP LaserJet Enterprise MFP M630 User Guide 1 - Page 78
Set up Save to Network Folder, Use the Save to Network Folder Quick Set Wizard
 |
View all HP LaserJet Enterprise MFP M630 manuals
Add to My Manuals
Save this manual to your list of manuals |
Page 78 highlights
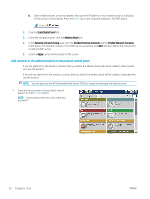
Set up Save to Network Folder Use the following information to configure a Save to Network Folder quick set. ● Use the Save to Network Folder Quick Set Wizard ● Set up Save to Network Folder via the HP Embedded Web Server ● Complete the destination folder settings Use the Save to Network Folder Quick Set Wizard Some HP products include driver installation from a software CD. At the end of this installation is an option to Setup Scan to Folder and Email. This option opens the setup wizards that are in the HP Embedded Web Server (EWS) for the product. The setup wizards include the options for basic configuration. To begin, click Save to Network Folder Quick Set Wizard. Follow the instructions on the screen. Click Next to advance to the next step in the wizard. For more detailed setup information, see the sections that follow to configure this feature through the complete set of Save to Network Folder options. Set up Save to Network Folder via the HP Embedded Web Server 1. Open the HP Embedded Web Server (EWS): a. From the Home screen on the product control panel, touch the Network button to display the IP address or host name. b. Open a Web browser, and in the address line, type the IP address or host name exactly as it displays on the product control panel. Press the Enter key on the computer keyboard. The EWS opens. 2. Click the Scan/Digital Send tab. 3. On the left navigation menu, click Save to Network Folder Setup link. 4. On the Save to Network Folder Setup dialog, select the Enable Save to Network Folder check box. NOTE: The Save to Network Folder feature can be minimally configured by selecting this check box and not creating a quick set. However, for this basic configuration, the user must enter the destination folder information at the control panel for each scan job. A quick set is required to include Save to Network Folder metadata. 5. Under the Quick Sets section, click Add. 6. On the Set the button location for the Quick Set and options for user interaction at the control panel dialog, enter a title and description for the Save to Network Folder quick set. Select the button location for the quick set and the quick set start option. Click Next. 7. On the Folder Settings dialog, click Add to create a destination folder. Set the options to use and click Next. NOTE: For additional help with folder settings, see Complete the destination folder settings on page 67. 8. On the Notification Settings dialog, select the scan status notification preference. Click Next. 66 Chapter 6 Scan ENWW
-
 1
1 -
2
-
3
-
4
-
5
-
6
-
7
-
8
-
9
-
10
-
11
-
12
-
13
-
14
-
15
-
16
-
17
-
18
-
19
-
20
-
21
-
22
-
23
-
24
-
25
-
26
-
27
-
28
-
29
-
30
-
31
-
32
-
33
-
34
-
35
-
36
-
37
-
38
-
39
-
40
-
41
-
42
-
43
-
44
-
45
-
46
-
47
-
48
-
49
-
50
-
51
-
52
-
53
-
54
-
55
-
56
-
57
-
58
-
59
-
60
-
61
-
62
-
63
-
64
-
65
-
66
-
67
-
68
-
69
-
70
-
71
-
72
-
 73
73 -
 74
74 -
 75
75 -
 76
76 -
 77
77 -
 78
78 -
 79
79 -
 80
80 -
 81
81 -
 82
82 -
 83
83 -
84
-
85
-
86
-
87
-
88
-
89
-
90
-
91
-
92
-
93
-
94
-
95
-
96
-
97
-
98
-
99
-
100
-
101
-
102
-
103
-
104
-
105
-
106
-
107
-
108
-
109
-
110
-
111
-
112
-
113
-
114
-
115
-
116
-
117
-
118
-
119
-
120
-
121
-
122
-
123
-
124
-
125
-
126
-
127
-
128
-
129
-
130
-
131
-
132
-
133
-
134
-
135
-
136
-
137
-
138
-
139
-
140
-
141
-
142
-
143
-
144
-
145
-
146
-
147
-
148
-
149
-
150
-
151
-
152
-
153
-
154
-
155
-
156
-
157
-
158
-
159
-
160
-
161
-
162
-
163
-
164
-
165
-
166
-
167
-
168
-
169
-
170
-
171
-
172
-
173
-
174
-
175
-
176
-
177
-
178
-
179
-
180
-
181
-
182
-
183
-
184
-
185
-
186
-
187
-
188
-
189
-
190
-
191
-
192
-
193
-
194
-
195
-
196
-
197
-
198
-
199
-
200
-
201
-
202
-
203
-
204
-
205
-
206
-
207
-
208
-
209
-
210
-
211
-
212
-
213
-
214
-
215
-
216
 |
 |
