HP Officejet 4500 Getting Started Guide - Page 8
Step 1: Connect the printer to the phone line, services with the printer, see the boxes - ink cartridge
 |
View all HP Officejet 4500 manuals
Add to My Manuals
Save this manual to your list of manuals |
Page 8 highlights
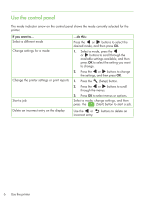
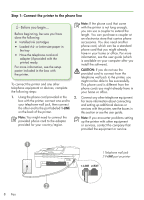
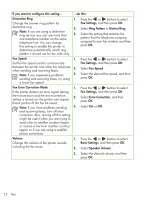
Step 1: Connect the printer to the phone line Before you begin... Before beginning, be sure you have done the following: • Installed ink cartridges • Loaded A4- or Letter-size paper in the tray • Have the telephone cord and adapter (if provided with the printer) ready. For more information, see the setup poster included in the box with the printer. To connect the printer and any other telephone equipment or devices, complete the following steps: Note: If the phone cord that came with the printer is not long enough, you can use a coupler to extend the length. You can purchase a coupler at an electronics store that carries phone accessories. You also need another phone cord, which can be a standard phone cord that you might already have in your home or office. For more information, see the user guide (which is available on your computer after you install the software). CAUTION: If you do not use the provided cord to connect from the telephone wall jack to the printer, you might not be able to fax successfully. This phone cord is different from the phone cords you might already have in your home or office. 1. Using the phone cord provided in the 2. Connect any other telephone equipment. box with the printer, connect one end to For more information about connecting your telephone wall jack, then connect and setting up additional devices or the other end to the port labeled 1-LINE services with the printer, see the boxes in on the back of the printer. this section or see the user guide. Note: You might need to connect the provided phone cord to the adapter provided for your country/region. Note: If you encounter problems setting up the printer with other equipment or services, contact the company that provided the equipment or service. 1 Telephone wall jack 2 1-LINE port on printer 8 Fax
-
 1
1 -
2
-
 3
3 -
 4
4 -
 5
5 -
 6
6 -
 7
7 -
 8
8 -
 9
9 -
 10
10 -
 11
11 -
 12
12 -
 13
13 -
14
-
15
-
16
-
17
-
18
-
19
-
20
-
21
-
22
-
23
-
24
-
25
-
26
-
27
-
28
-
29
-
30
-
31
-
32
-
33
-
34
-
35
-
36
-
37
-
38
-
39
-
40
-
41
-
42
-
43
-
44
-
45
-
46
-
47
-
48
-
49
-
50
-
51
-
52
-
53
-
54
-
55
-
56
-
57
-
58
-
59
-
60
-
61
-
62
-
63
-
64
-
65
-
66
-
67
-
68
-
69
-
70
-
71
-
72
-
73
-
74
-
75
-
76
-
77
-
78
-
79
-
80
-
81
-
82
-
83
-
84
-
85
-
86
-
87
-
88
-
89
-
90
-
91
-
92
-
93
-
94
-
95
-
96
-
97
-
98
-
99
-
100
-
101
-
102
-
103
-
104
-
105
-
106
-
107
-
108
-
109
-
110
-
111
-
112
-
113
-
114
-
115
-
116
-
117
-
118
-
119
-
120
-
121
-
122
-
123
-
124
-
125
-
126
 |
 |
