HP Officejet Pro L7400 User Guide - Page 73
Something on the is missing or incorrect, Placement of the text or graphics is wrong
 |
View all HP Officejet Pro L7400 manuals
Add to My Manuals
Save this manual to your list of manuals |
Page 73 highlights
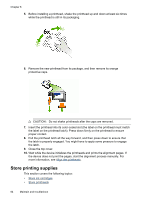
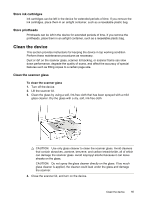
Check the printhead • Make sure the printhead is inserted into its correct color-coded slot. For more information, see Replace the printheads. • Remove the printhead, and check to make sure the orange protective caps have been removed from the printhead. Clean the printhead Complete the printhead cleaning procedure. For more information, see Maintain the printheads. Turn off the device after removing the printhead After removing the printhead, turn off the device, wait about 20 seconds, and turn it on again without the printhead installed. After it has restarted, reinsert the printhead. Something on the page is missing or incorrect Check the printheads Print the print quality diagnostic page on a clean sheet of white paper. Evaluate any problem areas, and perform the recommended actions. For more information, see Print the print quality diagnostic page. Check the margin settings Make sure the margin settings for the document do not exceed the printable area of the device. For more information, see Set minimum margins. Check the color print settings Make sure Print in Grayscale is not selected in the printer driver. For information on changing this setting, see Change print settings. Check the device location and length of USB cable High electromagnetic fields (such as those generated by USB cables) can sometimes cause slight distortions to printouts. Move the device away from the source of the electromagnetic fields. Also, it is recommended that you use a USB cable that is less than 3 meters (9.8 feet) long to minimize the effects of these electromagnetic fields. Placement of the text or graphics is wrong Check how the media is loaded Make sure the media width and length guides fit snugly against the edges of the stack of media, and make sure the tray is not overloaded. For more information, see Load media. Solve printing problems 69
-
 1
1 -
2
-
3
-
4
-
5
-
6
-
7
-
8
-
9
-
10
-
11
-
12
-
13
-
14
-
15
-
16
-
17
-
18
-
19
-
20
-
21
-
22
-
23
-
24
-
25
-
26
-
27
-
28
-
29
-
30
-
31
-
32
-
33
-
34
-
35
-
36
-
37
-
38
-
39
-
40
-
41
-
42
-
43
-
44
-
45
-
46
-
47
-
48
-
49
-
50
-
51
-
52
-
53
-
54
-
55
-
56
-
57
-
58
-
59
-
60
-
61
-
62
-
63
-
64
-
65
-
66
-
67
-
 68
68 -
 69
69 -
 70
70 -
 71
71 -
 72
72 -
 73
73 -
 74
74 -
 75
75 -
 76
76 -
 77
77 -
 78
78 -
79
-
80
-
81
-
82
-
83
-
84
-
85
-
86
-
87
-
88
-
89
-
90
-
91
-
92
-
93
-
94
-
95
-
96
-
97
-
98
-
99
-
100
-
101
-
102
-
103
-
104
-
105
-
106
-
107
-
108
-
109
-
110
-
111
-
112
-
113
-
114
-
115
-
116
-
117
-
118
-
119
-
120
 |
 |