HP PageWide 377 User Guide - Page 99
Set up scan to email in the HP Printer Assistant, Set up scan to email (OS X)
 |
View all HP PageWide 377 manuals
Add to My Manuals
Save this manual to your list of manuals |
Page 99 highlights
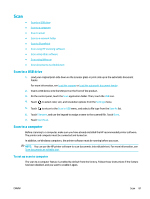
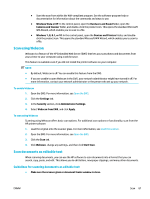
5. Under Scan to Email, click Email Options, and configure the scan and file settings for email sent from the printer. 6. Click Apply. Set up scan to email in the HP Printer Assistant 1. Open the HP Printer Assistant. For more information, see Open the HP Printer Assistant. 2. On the Scan tab, click Scan to E-mail Wizard and follow the onscreen instructions. Set up scan to email (OS X) 1. Open HP Utility. For more information, see Open HP Utility. 2. Click Scan to Email. The EWS opens. Follow the instructions in Set up scan to email in the EWS. To scan a document or photo to email 1. Load your original print-side down on the scanner glass or print-side up in the automatic document feeder. For more information, see Load the scanner or Load the automatic document feeder. 2. On the control panel, touch the Scan application folder. 3. In the display, touch the Email icon, and select the email account you want. NOTE: If you do not have an account, set up the scan-to-email feature. 4. If prompted, enter the PIN. 5. Verify or change the information in the To, Subject, and File Name fields. To change the email recipients, touch . 6. Touch Touch to Preview, and then touch Start Scan. To change account settings ● Change account settings in the EWS ● Change account settings (OS X) Change account settings in the EWS 1. Open the EWS. For more information, see Open the EWS. 2. On the Scan tab, click Scan to Email, and then click Scan to Email Setup. 3. In the setup page, do one of the following: ● If your organization uses one email server for all its emails: In the Outgoing Email Settings section, change the email addresses and the SMTP server information, as needed. ● If your organization uses multiple email servers for its emails: In the Outgoing Email Profiles section, change the email addresses, names, and security PINs for each email profile, as needed. ENWW Scan 83
-
 1
1 -
2
-
3
-
4
-
5
-
6
-
7
-
8
-
9
-
10
-
11
-
12
-
13
-
14
-
15
-
16
-
17
-
18
-
19
-
20
-
21
-
22
-
23
-
24
-
25
-
26
-
27
-
28
-
29
-
30
-
31
-
32
-
33
-
34
-
35
-
36
-
37
-
38
-
39
-
40
-
41
-
42
-
43
-
44
-
45
-
46
-
47
-
48
-
49
-
50
-
51
-
52
-
53
-
54
-
55
-
56
-
57
-
58
-
59
-
60
-
61
-
62
-
63
-
64
-
65
-
66
-
67
-
68
-
69
-
70
-
71
-
72
-
73
-
74
-
75
-
76
-
77
-
78
-
79
-
80
-
81
-
82
-
83
-
84
-
85
-
86
-
87
-
88
-
89
-
90
-
91
-
92
-
93
-
 94
94 -
 95
95 -
 96
96 -
 97
97 -
 98
98 -
 99
99 -
 100
100 -
 101
101 -
 102
102 -
 103
103 -
 104
104 -
105
-
106
-
107
-
108
-
109
-
110
-
111
-
112
-
113
-
114
-
115
-
116
-
117
-
118
-
119
-
120
-
121
-
122
-
123
-
124
-
125
-
126
-
127
-
128
-
129
-
130
-
131
-
132
-
133
-
134
-
135
-
136
-
137
-
138
-
139
-
140
-
141
-
142
-
143
-
144
-
145
-
146
-
147
-
148
-
149
-
150
-
151
-
152
-
153
-
154
-
155
-
156
-
157
-
158
-
159
-
160
-
161
-
162
-
163
-
164
-
165
-
166
-
167
-
168
-
169
-
170
-
171
-
172
-
173
-
174
-
175
-
176
-
177
-
178
-
179
-
180
-
181
-
182
-
183
-
184
-
185
-
186
-
187
-
188
-
189
-
190
-
191
-
192
-
193
-
194
-
195
-
196
-
197
-
198
-
199
-
200
-
201
-
202
-
203
 |
 |
