HP Pavilion a1000 PC Basics Guide - Page 21
Using a Microphone
 |
View all HP Pavilion a1000 manuals
Add to My Manuals
Save this manual to your list of manuals |
Page 21 highlights
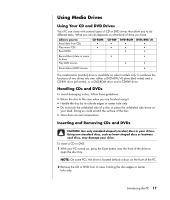
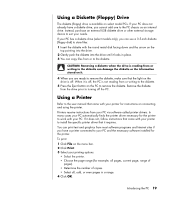
The two ways to use the Volume icon are: 1 Click the Volume icon on the taskbar. 2 Adjust the volume. 3 When you are satisfied with the sound level, click outside the Volume window to close this window. Or 1 Double-click the Volume icon on the taskbar. The Volume Control settings window opens. 2 Adjust the volume. 3 When you are satisfied with the sound level, click the Close box (the X in the upper-right corner) to close this window. Using a Microphone Your PC comes with one microphone connector in the back of the PC. Some models have a second microphone connector in the front of the PC. Only one microphone connector works at a time, and the back connector is ready to use unless you have the multi-channel audio speakers option. For PCs with the multi-channel audio speakers option, the microphone connector in the front of the PC, if present, is ready to use. To use a microphone connected to the front of your PC (select models only), select the working microphone. NOTE: If you connect your microphone to the back of your PC, you do not need to perform this procedure. 1 Double-click the Volume icon on the taskbar. The Volume Control settings window opens. NOTE: If you do not see this Volume icon, click Start, click Control Panel, click Sounds, Speech, and Audio Devices, if it is present, and then double-click Sounds and Audio Devices to open the Sounds and Audio Devices Properties window. On the Volume tab, place a check in the Place volume icon in the taskbar check box. Click Apply, and then click OK. The Volume icon appears in the taskbar. 2 Select Options and click Properties. 3 In Adjust volume for, click Recording. 4 In Show the following volume controls, place a check in the Microphone check box. Introducing the PC 15
-
 1
1 -
2
-
3
-
4
-
5
-
6
-
7
-
8
-
9
-
10
-
11
-
12
-
13
-
14
-
15
-
 16
16 -
 17
17 -
 18
18 -
 19
19 -
 20
20 -
 21
21 -
 22
22 -
 23
23 -
 24
24 -
 25
25 -
 26
26 -
27
-
28
-
29
-
30
-
31
-
32
-
33
-
34
-
35
-
36
-
37
-
38
-
39
-
40
-
41
-
42
-
43
-
44
-
45
-
46
-
47
-
48
-
49
-
50
 |
 |