HP ProLiant BL660c Configuring Arrays on HP Smart Array Controllers Reference - Page 29
Configuration screen
 |
View all HP ProLiant BL660c manuals
Add to My Manuals
Save this manual to your list of manuals |
Page 29 highlights
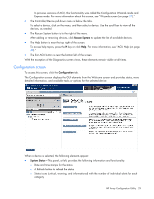
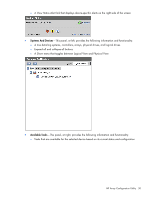
In previous versions of ACU, this functionality was called the Configuration Wizards mode and Express mode. For more information about this screen, see "Wizards screen (on page 37)." • The Controller/Device pull-down menu is below the tabs. To select a device, click on the menu, and then select a device. Use the scroll bar to view all the devices, as needed. • The Rescan System button is to the right of the menu. After adding or removing devices, click Rescan System to update the list of available devices. • The Help button is near the top right of the screen. To access help topics, press the H key or click Help. For more information, see "ACU Help (on page 40)." • The Exit ACU button is near the bottom left of the screen. With the exception of the Diagnostics screen views, these elements remain visible at all times. Configuration screen To access this screen, click the Configuration tab. The Configuration screen displays the GUI elements from the Welcome screen and provides status, more detailed information, and available tasks or options for the selected device. When a device is selected, the following elements appear: • System Status-This panel, at left, provides the following information and functionality: o Date and time stamps for the status o A Refresh button to refresh the status o Status icons (critical, warning, and informational) with the number of individual alerts for each category HP Array Configuration Utility 29
-
 1
1 -
2
-
3
-
4
-
5
-
6
-
7
-
8
-
9
-
10
-
11
-
12
-
13
-
14
-
15
-
16
-
17
-
18
-
19
-
20
-
21
-
22
-
23
-
 24
24 -
 25
25 -
 26
26 -
 27
27 -
 28
28 -
 29
29 -
 30
30 -
 31
31 -
 32
32 -
 33
33 -
 34
34 -
35
-
36
-
37
-
38
-
39
-
40
-
41
-
42
-
43
-
44
-
45
-
46
-
47
-
48
-
49
-
50
-
51
-
52
-
53
-
54
-
55
-
56
-
57
-
58
-
59
-
60
-
61
-
62
-
63
-
64
-
65
-
66
-
67
-
68
-
69
-
70
-
71
-
72
-
73
-
74
-
75
-
76
-
77
-
78
-
79
-
80
-
81
-
82
-
83
-
84
-
85
-
86
-
87
-
88
-
89
-
90
-
91
-
92
-
93
-
94
-
95
-
96
-
97
-
98
-
99
-
100
-
101
-
102
-
103
-
104
-
105
-
106
-
107
-
108
-
109
-
110
-
111
-
112
 |
 |
