HP StorageWorks 8/80 Brocade EZSwitchSetup Administrator's Guide v6.2.0 (53-10 - Page 29
Setting switch parameters, Zoning selection options, Select Zoning wizard
 |
View all HP StorageWorks 8/80 manuals
Add to My Manuals
Save this manual to your list of manuals |
Page 29 highlights
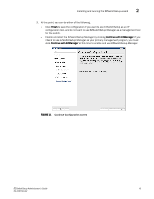
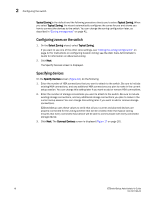
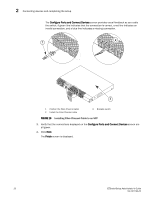
Configuring the switch 2 Setting switch parameters 1. Follow the onscreen directions to set a new admin password for the switch. Make sure to record your password and keep it in a secure location for future reference. 2. Optional: Enter a new name for the switch and set the correct date and time. 3. Click Next. The Select Zoning screen is displayed. Zoning selection options The next step in configuring your switch is to select zoning. There are three choices: • Typical Zoning creates a port based zoning scheme based on the connections made on the Configure Ports and Connect Devices screen (Figure 17). This zoning scheme creates a two member zone for every possible pairing of H and S ports connected on the Configure Ports and Connect Devices screen. This ensures that any host device connected to an H port is able to communicate with any storage device connected to an S port. • Custom Zoning allows you to customize which initiators access which targets, and creates a device-based zoning scheme based on your choices. The HBAs and storage devices should already be connected to the switch. Custom Zoning provides a device accessibility matrix for you to modify; it then automatically creates zones based on that matrix. Custom Zoning supports only single-switch fabrics. If you select this option, when you click Next, the wizard closes and the EZSwitchSetup Switch Manager application opens. • Advanced Zoning allows you complete customization of your zoning and should be used if you are familiar with zoning and zoning practices. If you select this option, when you click Next, the wizard closes and the Advanced Management application (Web Tools) opens. For specific information about using Web Tools for zoning, see the Web Tools Administrator's Guide. . FIGURE 15 Select Zoning wizard EZSwitchSetup Administrator's Guide 17 53-1001193-02
-
 1
1 -
2
-
3
-
4
-
5
-
6
-
7
-
8
-
9
-
10
-
11
-
12
-
13
-
14
-
15
-
16
-
17
-
18
-
19
-
20
-
21
-
22
-
23
-
 24
24 -
 25
25 -
 26
26 -
 27
27 -
 28
28 -
 29
29 -
 30
30 -
 31
31 -
 32
32 -
 33
33 -
 34
34 -
35
-
36
-
37
-
38
-
39
-
40
-
41
-
42
-
43
-
44
-
45
-
46
-
47
-
48
-
49
-
50
-
51
-
52
-
53
-
54
-
55
-
56
-
57
-
58
-
59
-
60
-
61
-
62
-
63
-
64
 |
 |
