HP StorageWorks 8/80 Brocade EZSwitchSetup Administrator's Guide v6.2.0 (53-10 - Page 33
Con Ports and Connect Devices, Installing SFPs
 |
View all HP StorageWorks 8/80 manuals
Add to My Manuals
Save this manual to your list of manuals |
Page 33 highlights
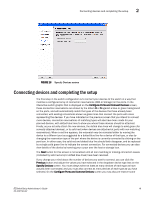
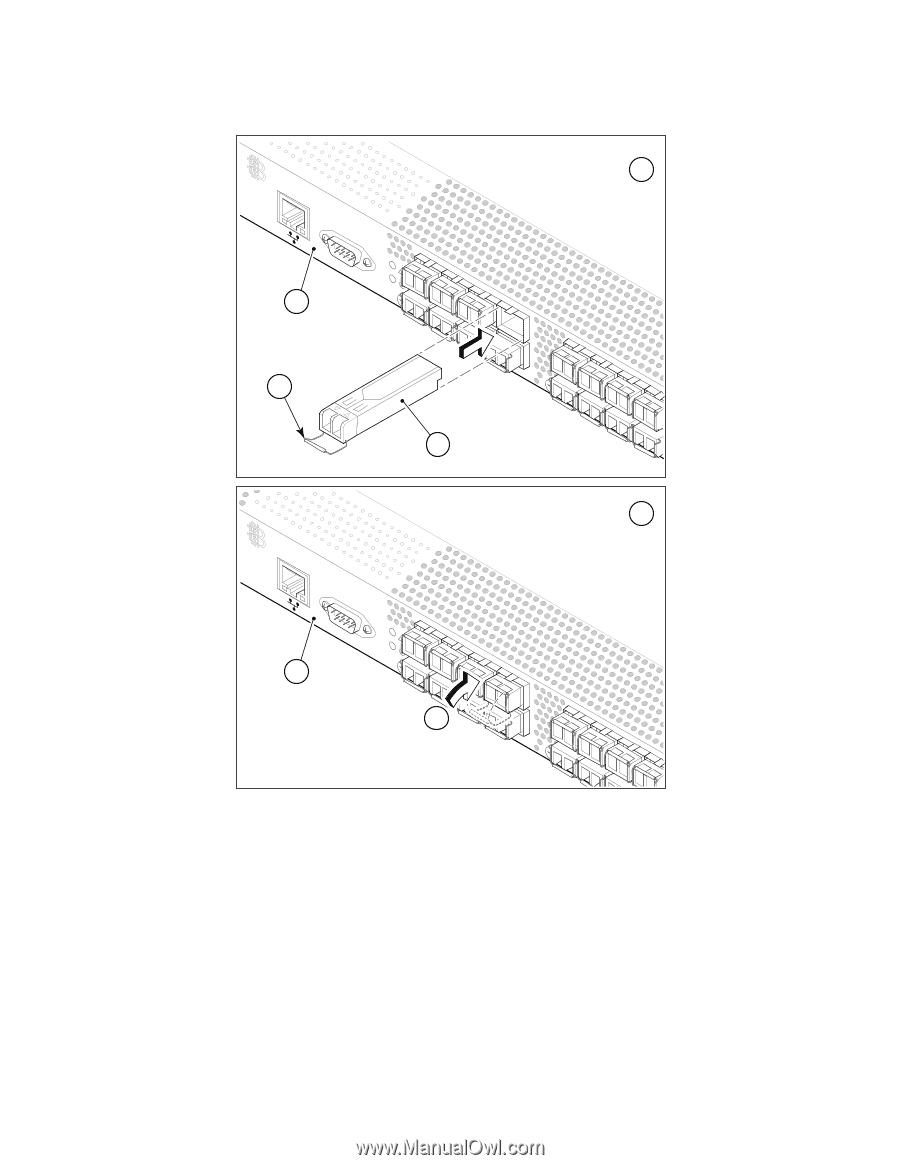
Connecting devices and completing the setup 2 A IOIOI ! 1 2 3 scale: 1/2" = 1" B IOIOI 1 ! 4 4-01 1 Brocade switch 2 Open the SFP bale 3 Position SFP and insert until firmly seated 4 Close the latching bale FIGURE 18 Installing SFPs 2. Connect Fibre Channel cables from the switch to your host and storage devices. Ensure that the physical connections are exactly as indicated on the Configure Ports and Connect Devices screen. a. Remove any plastic protectors from the Fibre Channel cable ends, and position the cable connector so that it is oriented correctly. b. Insert the cable connector into the SFP until it is firmly seated and the latching mechanism clicks. EZSwitchSetup Administrator's Guide 21 53-1001193-02
-
 1
1 -
2
-
3
-
4
-
5
-
6
-
7
-
8
-
9
-
10
-
11
-
12
-
13
-
14
-
15
-
16
-
17
-
18
-
19
-
20
-
21
-
22
-
23
-
24
-
25
-
26
-
27
-
 28
28 -
 29
29 -
 30
30 -
 31
31 -
 32
32 -
 33
33 -
 34
34 -
 35
35 -
 36
36 -
 37
37 -
 38
38 -
39
-
40
-
41
-
42
-
43
-
44
-
45
-
46
-
47
-
48
-
49
-
50
-
51
-
52
-
53
-
54
-
55
-
56
-
57
-
58
-
59
-
60
-
61
-
62
-
63
-
64
 |
 |
EZSwitchSetup Administrator’s Guide
21
53-1001193-02
Connecting devices and completing the setup
2
FIGURE 18
Installing SFPs
2.
Connect Fibre Channel cables from the switch to your host and storage devices. Ensure that
the physical connections are exactly as indicated on the
Configure Ports and Connect Devices
screen.
a.
Remove any plastic protectors from the Fibre Channel cable ends, and position the cable
connector so that it is oriented correctly.
b.
Insert the cable connector into the SFP until it is firmly seated and the latching mechanism
clicks.
1
Brocade switch
3
Position SFP and insert until firmly seated
2
Open the SFP bale
4
Close the latching bale
IOIOI
!
scale: 1/2" = 1"
IOIOI
!
3
2
1
1
A
B
4
4-01