HP StoreOnce 4430 HP D2D Backup System Installation and Configuration guide (E - Page 19
HP D2D4100 Series Backup System
 |
View all HP StoreOnce 4430 manuals
Add to My Manuals
Save this manual to your list of manuals |
Page 19 highlights
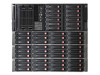
Figure 15 Cabling the Capacity Upgrade Kit to the HP D2D4312 Backup System 1. Power connectors 3. Power on/off button 2. P1 connector (on I/O-A) 4. Port connector on RAID card 3. Use the supplied power cords to connect the Capacity Upgrade Kit(s) to the mains power supply. 4. Power on the Capacity Upgrade Kit(s). You may need to hold down the power on button on each installed shelf for a few seconds. HP D2D4100 Series Backup System Make sure you have the correct Capacity Upgrade Kit for your HP StoreOnce Backup System. • HP D2D4312/4112 Backup System Capacity Upgrade Kit: This consists of an enclosure with 12 x 1 TB disks and two cables, and is for use with both the HP D2D4112 and the HP D2D4312 Backup System. The second cable is a longer cable that is suitable for connecting to an HP D2D4312 that already has upgrade kits installed. • HP D2D4106 Backup System Capacity Upgrade Kit: This kit consists of an enclosure with 12 x 500 GB disks and one cable, and is for use with the HP D2D4106 Backup System only. 1. To ensure correct keying, first connect the supplied cable to the P1 connector on the top I/O module (I/O-A) on the rear of the Capacity Upgrade Kit. NOTE: Always use the P1 connector; do not use the P2 connector. 2. Connect the other end of the cable to the port labeled "Port 1E" on the RAID PCI-e card on the rear of the HP StoreOnce Backup System. 3. Use the supplied power cords to connect the Capacity Upgrade Kit to the mains power supply. Connecting to the Capacity Upgrade Kit (optional) 19
-
 1
1 -
2
-
3
-
4
-
5
-
6
-
7
-
8
-
9
-
10
-
11
-
12
-
13
-
 14
14 -
 15
15 -
 16
16 -
 17
17 -
 18
18 -
 19
19 -
 20
20 -
 21
21 -
 22
22 -
 23
23 -
 24
24 -
25
-
26
-
27
-
28
-
29
-
30
-
31
-
32
-
33
-
34
-
35
-
36
-
37
-
38
-
39
-
40
-
41
-
42
-
43
-
44
-
45
-
46
-
47
-
48
-
49
-
50
-
51
-
52
-
53
-
54
-
55
-
56
-
57
-
58
-
59
 |
 |
