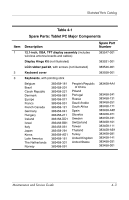
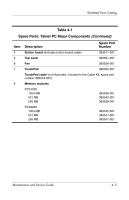
HP Tc4200 HP Compaq tc4200 Tablet PC - Maintenance and Service Guide - Page 63
additional 15 seconds to program the image into flash
 |
View all HP Tc4200 manuals
Add to My Manuals
Save this manual to your list of manuals |
Page 63 highlights
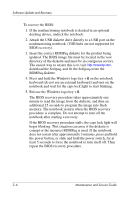
Software Update and Recovery To recover the BIOS: 1. If the nonfunctioning notebook is docked in an optional docking device, undock the notebook. 2. Attach the USB diskette drive directly to a USB port on the nonfunctioning notebook. (USB hubs are not supported for BIOS recovery). 3. Insert the correct ROMPaq diskette for the product being updated. The BIOS image file must be located in the root directory of the diskette and must be in contiguous sectors. The easiest way to ensure this is to visit http://www.hp.com, download the Softpaq, and let the Softpaq create the ROMPaq diskette. 4. Press and hold the Windows logo key + B on the notebook keyboard (do not use an external keyboard) and turn on the notebook and wait for the caps lock light to start blinking. 5. Release the Windows logo key + B. The BIOS recovery procedure takes approximately one minute to read the image from the diskette, and then an additional 15 seconds to program the image into flash memory. The notebook restarts when the BIOS recovery procedure is complete. Do not attempt to turn off the notebook after starting a recovery. If the BIOS recovery procedure stalls, the caps lock light will begin blinking. This situation can arise if the diskette is corrupt or the incorrect ROMPaq is used. If the notebook does not restart after approximately 3 minutes, press and hold the power button, or slide and hold the power switch, for at least 5 seconds to force the notebook to turn itself off. Then repeat the BIOS recovery procedure. 3-6 Maintenance and Service Guide
-
 1
1 -
2
-
3
-
4
-
5
-
6
-
7
-
8
-
9
-
10
-
11
-
12
-
13
-
14
-
15
-
16
-
17
-
18
-
19
-
20
-
21
-
22
-
23
-
24
-
25
-
26
-
27
-
28
-
29
-
30
-
31
-
32
-
33
-
34
-
35
-
36
-
37
-
38
-
39
-
40
-
41
-
42
-
43
-
44
-
45
-
46
-
47
-
48
-
49
-
50
-
51
-
52
-
53
-
54
-
55
-
56
-
57
-
 58
58 -
 59
59 -
 60
60 -
 61
61 -
 62
62 -
 63
63 -
 64
64 -
 65
65 -
 66
66 -
 67
67 -
 68
68 -
69
-
70
-
71
-
72
-
73
-
74
-
75
-
76
-
77
-
78
-
79
-
80
-
81
-
82
-
83
-
84
-
85
-
86
-
87
-
88
-
89
-
90
-
91
-
92
-
93
-
94
-
95
-
96
-
97
-
98
-
99
-
100
-
101
-
102
-
103
-
104
-
105
-
106
-
107
-
108
-
109
-
110
-
111
-
112
-
113
-
114
-
115
-
116
-
117
-
118
-
119
-
120
-
121
-
122
-
123
-
124
-
125
-
126
-
127
-
128
-
129
-
130
-
131
-
132
-
133
-
134
-
135
-
136
-
137
-
138
-
139
-
140
-
141
-
142
-
143
-
144
-
145
-
146
-
147
-
148
-
149
-
150
-
151
-
152
-
153
-
154
-
155
-
156
-
157
-
158
-
159
-
160
-
161
-
162
-
163
-
164
-
165
-
166
-
167
-
168
-
169
-
170
-
171
-
172
-
173
-
174
-
175
-
176
-
177
-
178
-
179
-
180
-
181
-
182
-
183
-
184
-
185
-
186
-
187
-
188
-
189
-
190
-
191
-
192
-
193
-
194
-
195
-
196
-
197
-
198
-
199
 |
 |
