Husqvarna AUTOMOWER 310 Owner Manual
Husqvarna AUTOMOWER 310 Manual
 |
View all Husqvarna AUTOMOWER 310 manuals
Add to My Manuals
Save this manual to your list of manuals |
Husqvarna AUTOMOWER 310 manual content summary:
- Husqvarna AUTOMOWER 310 | Owner Manual - Page 1
Operator's manual HUSQVARNA AUTOMOWER® 310/315/315X Read the operator's manual carefully and make sure that you understand the instructions before you use the product. EN, English - Husqvarna AUTOMOWER 310 | Owner Manual - Page 2
the cutting height 37 5 Maintenance 5.1 Introduction - maintenance 38 5.2 Clean the product 38 5.3 Replace the blades 39 5.4 Battery 39 5.5 Winter service 40 6 Troubleshooting 6.1 Introduction - troubleshooting 41 6.2 Fault messages 41 6.3 Information messages 46 6.4 Indicator lamp in the - Husqvarna AUTOMOWER 310 | Owner Manual - Page 3
Support on page 3. The product is a robotic lawn mower. The product has a battery power source and cuts the grass automatically. Collection of grass is not necessary. The boundary wire and the guide wire controls the movement of the product within the work area. 1.2.1 Automower® Connect Automower - Husqvarna AUTOMOWER 310 | Owner Manual - Page 4
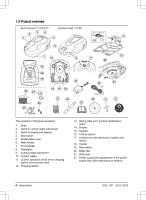
identification code) 14. Display 15. Keypad 16. Cutting system 17. Chassis box with electronics, battery and motors 18. Handle 19. Main switch 20. Blade disc 21. Skid plate 22. Power supply (the appearance of the power supply may differ depending on market) 4 - Introduction 1220 - 001 - 08.07.2019 - Husqvarna AUTOMOWER 310 | Owner Manual - Page 5
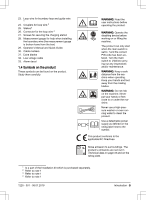
27. Screws for securing the charging station 28. Measurement gauge for help when installing the boundary wire (the measurement gauge is broken loose from the box) 29. Operator's Manual and Quick Guide 30. Cable markers 31. Extra blades 32. Low voltage cable 33. Alarm decal 1.4 Symbols on the product - Husqvarna AUTOMOWER 310 | Owner Manual - Page 6
is active. Flashes as it collects GPS information. (Automower® 315X) The GPS-supported navigation is not active. (Automower® 315X) 1.6 Symbols on the battery The installation function for manual settings for the installation. Read the user instructions. 6 - Introduction 1220 - 001 - 08.07.2019 - Husqvarna AUTOMOWER 310 | Owner Manual - Page 7
Do not discard the battery into fire and do not expose the battery to a heat source. Do not immerse the battery into water. 1220 - 001 - 08.07.2019 Introduction - 7 - Husqvarna AUTOMOWER 310 | Owner Manual - Page 8
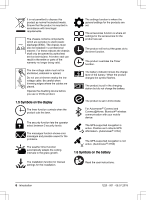
signal PIN code Duration Duration of alarm Duration of time lock Fault messages Info messages Weather timer * Use weather timer Cutting time Low Medium High * Automower® 315/315X 8 - Introduction 1220 - 001 - 08.07.2019 - Husqvarna AUTOMOWER 310 | Owner Manual - Page 9
Reset all About date user setting Set time Set date Time format Date format Low- Low Mid High High+ Accessories Information Connect@Home** Automower Connect Headlight*** Mower house * Automower® 315/315X **Automower® 310/315 ***Automower® 315X 1220 - 001 - 08.07.2019 Introduction - 9 - Husqvarna AUTOMOWER 310 | Owner Manual - Page 10
1.9 Display The display on the product shows information and settings of the product. To access the display, push the STOP button. 1.10 Keypad The keypad on the product let the operator navigate in the menu of the product. To access the keypad, push the STOP button. 3 24 1 5 6 7 1. The START - Husqvarna AUTOMOWER 310 | Owner Manual - Page 11
if there is a risk of damage to the product, other materials or the adjacent area if the instructions in the manual are not obeyed. 2.2 General safety instructions The following system is used in the Operator's Manual to make it easier to use: • Text written in italics is a text that is shown on - Husqvarna AUTOMOWER 310 | Owner Manual - Page 12
been given supervision or instruction concerning use of the appliance in a safe way and understand the hazards involved. Local regulations may restrict the age of the operator. Cleaning and maintenance shall not be made by children without supervision. Never connect the power supply to an outlet if - Husqvarna AUTOMOWER 310 | Owner Manual - Page 13
the Operator's Manual carefully and make sure you understand the instructions before using the product. 2.3 Safety instructions for operation 2.3.1 the lawn that manufacturer. All other types of use are can damage the blades. Objects on the lawn incorrect. The manufacturer's instructions can - Husqvarna AUTOMOWER 310 | Owner Manual - Page 14
more information about the battery, refer to Battery on page 39 page blade disc or body. Neither should it be used with defective blades, screws, nuts or cables. Never connect a damaged cable, or touch a damaged cable before it is disconnected from the supply 24. • Husqvarna does not guarantee - Husqvarna AUTOMOWER 310 | Owner Manual - Page 15
of the product, such as cleaning or replacing the blades. To reduce the risk of damage to electrical components in the product and the charging station, we recommend that all connections to the charging station are disconnected (power supply, boundary wire and guide wire) if there is a risk of - Husqvarna AUTOMOWER 310 | Owner Manual - Page 16
to put the charging station, the boundary wire and the guide wire. • Make an eyelet on the blueprint where the guide wire connects to the boundary wire. Refer to To install the guide wire on page 22. • Fill in holes in the lawn. 3.3.1 To examine where to put the charging station • Keep a minimum - Husqvarna AUTOMOWER 310 | Owner Manual - Page 17
device (RCD) when you connect the power supply to the power outlet. WARNING: Do not change the power supply. Do not cut or extend the lowvoltage cable. There is a risk of electrical shock. recommended to make an eyelet where the guide wire will be connected. Make the eyelet with approximately - Husqvarna AUTOMOWER 310 | Owner Manual - Page 18
eyelet (F) where the guide wire is to be connected to the boundary wire. CAUTION: Do not make sharp bends when you install the boundary wire. slope with boundary wire. • For slopes steeper than 10% along the outer edge of the lawn, put the boundary wire 20 cm / 8 in. (A) from the edge. >15% - Husqvarna AUTOMOWER 310 | Owner Manual - Page 19
secondary area Make a secondary area (B) if the work area has 2 areas that are not connected with a passage. The work area with the charging station is the main area (A). Note: The product must be manually moved between the main area and the secondary area. 3.3.3.5 To set the corridor width of the - Husqvarna AUTOMOWER 310 | Owner Manual - Page 20
passage is width of 0 to 9. smaller than 2 m / 6.5 ft., install a guide wire 4. Push the BACK button. through the passage. Minimum passage between the boundary in the lawn. • If the work area has areas which are connected by a narrow passage (B), you can set the product to leave the guide wire - Husqvarna AUTOMOWER 310 | Owner Manual - Page 21
21 and To install the guide wire on page 22. 8. Attach the charging station to the ground with the supplied screws. CAUTION: Do not make new holes in the charging station plate. min 30 cm / 12" CAUTION: The product is only to be used with the power supply unit supplied by Husqvarna. WARNING: Do not - Husqvarna AUTOMOWER 310 | Owner Manual - Page 22
, for example couplers. 1. Cut the boundary wire or the guide wire with a pair of wire cutters where it is necessary to install the extension. 2. Add wire where it is necessary to install the extension. 3. Put the boundary wire or the guide wire into position. 4. Put the wire ends into a coupler - Husqvarna AUTOMOWER 310 | Owner Manual - Page 23
is approximate and timer settings can be adjusted. Model Approximate operation capacity, m2/h / yd2 /h Automower® 310 56 / 0.01 Automower® 315 68 / 0.02 Automower® 315X 73 / 0.02 Example: A lawn of 500 m2 / 600 yd2, cut with a Automower® 310. 1220 - 001 - 08.07.2019 Installation - 23 - Husqvarna AUTOMOWER 310 | Owner Manual - Page 24
30 days. Enter the PIN-code to get access to the product. 3.9.3.1 To set the security level Select 1 of 3 security levels for your product. 24 - Installation 1220 - 001 - 08.07.2019 - Husqvarna AUTOMOWER 310 | Owner Manual - Page 25
Low, Medium or High frequency. 4. Push the BACK button. 3.9.5 Lawn Coverage The Lawn coverage function is used to guide the product to remote parts of the work area. If the work area includes areas that are connected with narrow passages, the Lawn coverage function is useful to be able to maintain - Husqvarna AUTOMOWER 310 | Owner Manual - Page 26
Automower® 315X. Disable the GPS Assisted Navigation to make manual settings in Lawn coverage. Note: It is recommended to use GPS Assisted Navigation. 1. Do steps 1-3 in To get access to the menu on page 23. 2. Use the arrow buttons and the OK button to move through the menu structure Installation - Husqvarna AUTOMOWER 310 | Owner Manual - Page 27
3. Use the arrow buttons and the OK button to move through the menu structure Installation > Lawn coverage > Area 1-3 > How far? 4. Use the number buttons to set 500 can make manual settings to make the product search for the guide wire or the boundary wire in 0-30 min from when the battery is low. - Husqvarna AUTOMOWER 310 | Owner Manual - Page 28
access to the menu on page 23. 2. Use the arrow buttons and the OK button to move through the menu structure Installation > Find charging station > Guide > More > Test guide. 3. Put the product 3 m / 9 ft. from the boundary wire. 4. Push the START button and close the hatch. 5. Make sure the product - Husqvarna AUTOMOWER 310 | Owner Manual - Page 29
and the OK button to move through the menu structure Installation > Advanced > Drive Past Wire. 3. Use the C > Select. 3. Push the BACK button. To connect a new charging station to a profile 1. Save the stops the signal in the boundary loop, the guide wire and the charging station, when the product - Husqvarna AUTOMOWER 310 | Owner Manual - Page 30
of the Spiral Cutting. 4. Push the BACK button. 3.9.10.4 Slope control In order to decrease lawn wear near the boundary wire in slopes, the product prevents to move in the opposite direction when the , for example serial number and firmware versions. 30 - Installation 1220 - 001 - 08.07.2019 - Husqvarna AUTOMOWER 310 | Owner Manual - Page 31
To install the Automower® Connect app 1. Download the Automower® Connect app on your mobile device. 2. Sign up for a Husqvarna account in the Automower® Connect app. 3. Log in to your Husqvarna account in the Automower® Connect app. 3.9.11.3 Automower® Connect@Home (Automower® 310/315) Connect@Home - Husqvarna AUTOMOWER 310 | Owner Manual - Page 32
and the OK button to move through the menu structure Accessories > Automower Connect > GeoFence > New center point. 4. Push the OK button to use and send data via the mobile net. Settings for Husqvarna SIM is default. 3.9.11.5 Headlights To set the schedule for Installation 1220 - 001 - 08.07.2019 - Husqvarna AUTOMOWER 310 | Owner Manual - Page 33
installed. Refer to Automower® Connect app on page 31. The product can also connect to mobile devises in other ways, for example Automower® Direct and Husqvarna Fleet Services™. 3.9.12.1 Automower® Direct Automower® Direct uses short-range Bluetooth® communication, and is included in Automower® 310 - Husqvarna AUTOMOWER 310 | Owner Manual - Page 34
WARNING: Read the safety instructions carefully before you start the product. WARNING: Keep your hands and feet away from the rotating blades. Never put your product operates until the battery is empty. When the battery is empty, the product stops and the message Needs manual charging shows in the - Husqvarna AUTOMOWER 310 | Owner Manual - Page 35
1. Press the STOP button on top of the product. The product stops and the blade motor stops. 4.6 To switch off the product 1. Press the STOP button on top good opportunity to water or play games on the lawn. Model Automower® 310 Automower® 315 Automower® 315X Standby time, minimum hours per day 6 - Husqvarna AUTOMOWER 310 | Owner Manual - Page 36
00:00 - 18:00 The timer setting ensures that the product begins cutting the lawn at 00:00. However the product is parked in standby mode in the charging a power supply which is intended for it. Incorrect use may result in electric shock, overheating or leakage of corrosive liquid from the battery. - Husqvarna AUTOMOWER 310 | Owner Manual - Page 37
Adjust the cutting height The cutting height can be varied from MIN (2 cm / 0.8 in.) to MAX (6 cm / 2.4 in.). CAUTION: During the first weeks after a new installation, the cutting height must be set to MAX to avoid damaging the loop wire. After this, the cutting height can be lowered step by step - Husqvarna AUTOMOWER 310 | Owner Manual - Page 38
and clean the product regularly and replace worn parts if necessary. All maintenance and servicing must be done according to Husqvarna's instructions. Refer to Warranty terms on page 56. It is important that the blade disc rotates easily. The edges of the blades should not be damaged. The lifetime - Husqvarna AUTOMOWER 310 | Owner Manual - Page 39
Husqvarna original blades embossed with the crowned H-mark logotype, refer to Warranty terms on page 56. 5. Remove each blade and screw. 6. Fasten new blades and screws. 7. Check that the blades can pivot freely. 5.4 Battery WARNING: Only charge the product using a charging station and power supply - Husqvarna AUTOMOWER 310 | Owner Manual - Page 40
lawn. Note: Battery life is dependent on the length of the season and how many hours a day the product is operating. A long season or many hours of use a day means that the battery must be replaced more regularly. Contact your local Husqvarna representative to replace the battery. 5.5 Winter service - Husqvarna AUTOMOWER 310 | Owner Manual - Page 41
cable is not damaged. Check that it is also properly connected to the charging station and to the power supply. Check that the boundary wire connectors are fitted properly to the charging station. Replace connectors if damaged. Refer to To install the boundary wire on page 21. Boundary wire broken - Husqvarna AUTOMOWER 310 | Owner Manual - Page 42
area The boundary wire connections to the Check that guide wire are installed in accordance with the instructions. Refer to Installation of the product on page 21. The guide wire is broken or not connec- Find out where the break is and rectify ted. it. The battery is spent. Replace the battery - Husqvarna AUTOMOWER 310 | Owner Manual - Page 43
the your local Husqvarna representative if keypad wet grass, wait until the lawn has dried before using the guide wire is not laid at an angle on a slope. If the guide where to put the guide wire on page wait until the lawn has dried before using turned over. Needs manual charging The product is - Husqvarna AUTOMOWER 310 | Owner Manual - Page 44
Mower switched off The alarm was activated because the product was switched OFF. Alarm! Mower stopped The alarm was activated because the product was stopped. Alarm! Mower the problem remains, the message requires action by authorized service technician. 44 - Troubleshooting 1220 - 001 - 08.07. - Husqvarna AUTOMOWER 310 | Owner Manual - Page 45
Cause Temporary battery Temporary battery or firmware related problem issue. Battery problem Charging current Wrong or faulty power supply unit. too high Connectivity prob- Potential problem on the connectivity lem circuit board in the product. Connectivity set- The connectivity settings - Husqvarna AUTOMOWER 310 | Owner Manual - Page 46
charging station and the guide wire are installed in accordance with the instructions. Refer to To install the guide wire on page 22. The guide wire is broken or not connec- Find out where the break is and rectify ted. it. The battery is spent. Replace the battery. Refer to Battery on page 39 - Husqvarna AUTOMOWER 310 | Owner Manual - Page 47
an- Contact your local Husqvarna repre- tenna. sentative. Fault in the circuit board or incorrect power supply in the charging station. The fault should be rectified by an authorized service technician. Contact your local Husqvarna representative. 1220 - 001 - 08.07.2019 Troubleshooting - 47 - Husqvarna AUTOMOWER 310 | Owner Manual - Page 48
has been installed according to the instructions. Refer to To install the charging station on page 21 The guide wire is blade disc. The battery is spent. Remove and clean the blade disc. Refer to Clean the product on page 38. Replace the battery. Refer to Battery on page 39. 48 - Troubleshooting - Husqvarna AUTOMOWER 310 | Owner Manual - Page 49
Replace the battery. Refer to Battery Lawn coverage function on page 26. The work area is too large. Blunt blades. Try to limit the work area or extend the work time. Refer to To set the timer on page 24. Replace all the blades. Refer to To replace the blades weeks after installation and then lower - Husqvarna AUTOMOWER 310 | Owner Manual - Page 50
suspected wire section. 3. Switch the connections between the guide wire and the boundary wire in the charging station. Start by switching connection AL and G1. If the indicator lamp is lit with a solid green light, then the break is somewhere on the 50 - Troubleshooting 1220 - 001 - 08.07.2019 - Husqvarna AUTOMOWER 310 | Owner Manual - Page 51
blue light. Then follow instruction in step 5 below connect a new boundary wire to AL. Connect replaced with a new wire. Always use original couplers. If the indicator lamp now is green, then the break is somewhere in the wire between the disconnected end to the point where the new wire is connected - Husqvarna AUTOMOWER 310 | Owner Manual - Page 52
a Torx 20. 7.2 Storage • Fully charge the product. Refer to To charge the battery on page 36. • Disconnect the product with the main switch. Refer to Main switch or use a Husqvarna wall hanger. • If you keep the charging station indoors, disconnect and remove the power supply and all the connectors - Husqvarna AUTOMOWER 310 | Owner Manual - Page 53
/ 20.1 25 / 9.8 10.1 / 22 Electrical system Automower® 310 Battery, Lithium-Ion 18 V/2.1 Ah 584 85 28-01, 584 Art. No. 85 28-02 Battery, Lithium-Ion 18 V/2.0 Ah 584 85 28-03 Art. No. Battery, Lithium-Ion 18.25 V/2.0 584 85 28-04 Ah Art. No. Power supply, V/28 V DC 100-240 Low voltage cable - Husqvarna AUTOMOWER 310 | Owner Manual - Page 54
to EN 50636-2-107:2015 Mowing Automower® 310 Cutting system Blade motor speed, rpm 2300 Power consumption during cut- 25 ting, Maximum length guide loop, m / 400 / 1300 ft Working capacity, m2 / yd2, +/- 1000 / 1196 20% Automower® 315 Automower® 315X 3 pivoted cutting blades 2300 2300 - Husqvarna AUTOMOWER 310 | Owner Manual - Page 55
IP-classification Robotic lawn mower Charging station Power supply Automower® 310 IPX4 IPX1 IPX4 Automower® 315 IPX4 IPX1 IPX4 Automower® 315X IPX4 IPX1 IPX4 Frequency Band Support Bluetooth® Frequency range Automower® Connect 3G Automower® Connect 2G 2400.0-2483.5 MHz Band 19 (800 MHz) Band 5 - Husqvarna AUTOMOWER 310 | Owner Manual - Page 56
changing or tampering with the product or its power supply. The blades and wheels are seen as disposable and are not covered by the warranty. If an error occurs with your Husqvarna product, please contact Husqvarna customer service for further instructions. Please have the receipt and the product - Husqvarna AUTOMOWER 310 | Owner Manual - Page 57
interference received, including interference that may cause undesired operation. Models with a hatch: The supplied label shall be attached to the product according to figure below. Husqvarna Automower® Connect This device contains the module FCC ID: XPY1CGM5NNN 1220 - 001 - 08.07.2019 Applicable - Husqvarna AUTOMOWER 310 | Owner Manual - Page 58
installation. This equipment generates, uses and can radiate radio frequency energy and, if not installed and used in accordance with the instructions and receiver. • Connect the equipment into an outlet on a circuit different from that to which the receiver is connected. • Consult the dealer - Husqvarna AUTOMOWER 310 | Owner Manual - Page 59
1220 - 001 - 08.07.2019 Applicable to US/CA market 59 - Husqvarna AUTOMOWER 310 | Owner Manual - Page 60
AUTOMOWER® is a trademark owned by Husqvarna AB. Copyright© 2019 HUSQVARNA. All rights reserved. www.husqvarna.com Original instructions 1141544-95 2019-08-27
-
 1
1 -
 2
2 -
 3
3 -
 4
4 -
 5
5 -
 6
6 -
 7
7 -
8
-
9
-
10
-
11
-
12
-
13
-
14
-
15
-
16
-
17
-
18
-
19
-
20
-
21
-
22
-
23
-
24
-
25
-
26
-
27
-
28
-
29
-
30
-
31
-
32
-
33
-
34
-
35
-
36
-
37
-
38
-
39
-
40
-
41
-
42
-
43
-
44
-
45
-
46
-
47
-
48
-
49
-
50
-
51
-
52
-
53
-
54
-
55
-
56
-
57
-
58
-
59
-
60
 |
 |
EN, English
Operator's manual
HUSQVARNA AUTOMOWER
®
310/315/315X
Read the operator's manual carefully and make sure that you
understand the instructions before you use the product.