Invacare TDXSPREE-CG Owners Manual 2 - Page 62
Removing/Installing or Tilting the Seat Assembly, Removing/Installing the Seat Assembly -
 |
View all Invacare TDXSPREE-CG manuals
Add to My Manuals
Save this manual to your list of manuals |
Page 62 highlights
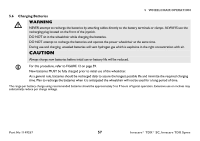
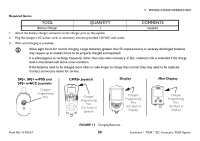
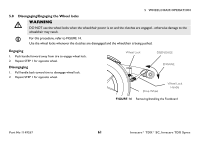
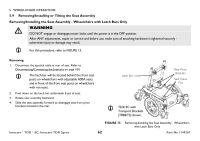
5 WHEELCHAIR OPERATION 5.9 Removing/Installing or Tilting the Seat Assembly Removing/Installing the Seat Assembly - Wheelchairs with Latch Bars Only ƽ WARNING DO NOT engage or disengage motor locks until the power is in the OFF position. After ANY adjustments, repair or service and before use, make sure all attaching hardware is tightened securely otherwise injury or damage may result. For this procedure, refer to FIGURE 15. Removing 1. Disconnect the joystick cable at rear of seat. Refer to Disconnecting/Connecting the Joysticks on page 104. The latch bar will be located behind the front seat posts on wheelchairs with adjustable ASBA seats and in front of the front seat posts on wheelchairs with van seats. 2. Push down on the latch bar underneath front of seat. 3. Rotate seat assembly backward. 4. Slide the seat assembly forward to disengage seat from pivot brackets located in the rear. Latch Bar TDX SC with Transport Brackets (TRBKTS) shown. Rear Pivot Brackets Seat Clevis Pins Invacare® TDX® SC, Invacare TDX Spree FIGURE 15 62 Removing/Installing the Seat Assembly - Wheelchairs with Latch Bars Only Part No 1149267
-
 1
1 -
2
-
3
-
4
-
5
-
6
-
7
-
8
-
9
-
10
-
11
-
12
-
13
-
14
-
15
-
16
-
17
-
18
-
19
-
20
-
21
-
22
-
23
-
24
-
25
-
26
-
27
-
28
-
29
-
30
-
31
-
32
-
33
-
34
-
35
-
36
-
37
-
38
-
39
-
40
-
41
-
42
-
43
-
44
-
45
-
46
-
47
-
48
-
49
-
50
-
51
-
52
-
53
-
54
-
55
-
56
-
 57
57 -
 58
58 -
 59
59 -
 60
60 -
 61
61 -
 62
62 -
 63
63 -
 64
64 -
 65
65 -
 66
66 -
 67
67 -
68
-
69
-
70
-
71
-
72
-
73
-
74
-
75
-
76
-
77
-
78
-
79
-
80
-
81
-
82
-
83
-
84
-
85
-
86
-
87
-
88
-
89
-
90
-
91
-
92
-
93
-
94
-
95
-
96
-
97
-
98
-
99
-
100
-
101
-
102
-
103
-
104
-
105
-
106
-
107
-
108
-
109
-
110
-
111
-
112
-
113
-
114
-
115
-
116
 |
 |
