Invacare TDXSPREE-CG Owners Manual 2 - Page 63
Tilting the Seat Assembly - Wheelchairs without Latch Bar Only
 |
View all Invacare TDXSPREE-CG manuals
Add to My Manuals
Save this manual to your list of manuals |
Page 63 highlights
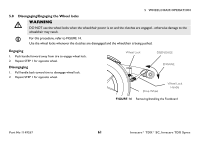
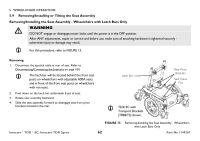
5 WHEELCHAIR OPERATION Installing 1. Position the seat in the rear pivot brackets as shown in FIGURE 15. 2. Rotate seat assembly forward. When seat is lowered, engage seat brackets into seat clevis pins.. ƽ WARNING When reinstalling the seat verify that the seat brackets are engaged with the seat clevis pins by pulling up on the latch bar. 3. Pull up on latch bar to verify that brackets are engaged with seat clevis pins. Tilting the Seat Assembly - Wheelchairs without Latch Bar Only ƽ WARNING Make sure power to the wheelchair is OFF before performing this procedure. Never leave the seat assembly in the UP/OPEN position unless necessary to perform a a procedure on the wheelchair otherwise injury or damage may result. For this procedure, refer to FIGURE 16 on page 64. Removing the seat is not necessary to access the battery compartment. The seat assembly tilts back and props into place to provide access to the batteries and the underside of the seat. Part No 1149267 63 Invacare® TDX® SC, Invacare TDX Spree
-
 1
1 -
2
-
3
-
4
-
5
-
6
-
7
-
8
-
9
-
10
-
11
-
12
-
13
-
14
-
15
-
16
-
17
-
18
-
19
-
20
-
21
-
22
-
23
-
24
-
25
-
26
-
27
-
28
-
29
-
30
-
31
-
32
-
33
-
34
-
35
-
36
-
37
-
38
-
39
-
40
-
41
-
42
-
43
-
44
-
45
-
46
-
47
-
48
-
49
-
50
-
51
-
52
-
53
-
54
-
55
-
56
-
57
-
 58
58 -
 59
59 -
 60
60 -
 61
61 -
 62
62 -
 63
63 -
 64
64 -
 65
65 -
 66
66 -
 67
67 -
 68
68 -
69
-
70
-
71
-
72
-
73
-
74
-
75
-
76
-
77
-
78
-
79
-
80
-
81
-
82
-
83
-
84
-
85
-
86
-
87
-
88
-
89
-
90
-
91
-
92
-
93
-
94
-
95
-
96
-
97
-
98
-
99
-
100
-
101
-
102
-
103
-
104
-
105
-
106
-
107
-
108
-
109
-
110
-
111
-
112
-
113
-
114
-
115
-
116
 |
 |