Invacare TDXSPREE-CG Owners Manual 2 - Page 66
Removing, Installing
 |
View all Invacare TDXSPREE-CG manuals
Add to My Manuals
Save this manual to your list of manuals |
Page 66 highlights
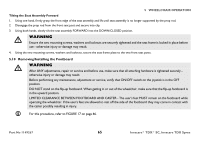
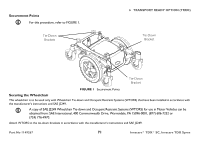
5 WHEELCHAIR OPERATION Removing 1. Remove the socket heat screw, three washers, spacer and locknut that secures the footboard to the footboard support. 2. Remove the footboard from the footboard support. Installing ƽ WARNING Pinch point may occur when rotating the footboard assembly. 1. Position the footboard onto the footboard support so that the mounting holes in the wheelchair frame align with the desired mounting holes in the footboard support. 2. Using the socket heat screw, three washers, spacer and locknut secure the footboard to the footboard support. Washer Spacer Footboard Support Washers Socket Head Screw Footboard Assembly Locknut FIGURE 17 Removing Invacare® TDX® SC, Invacare TDX Spree 66 Part No 1149267
-
 1
1 -
2
-
3
-
4
-
5
-
6
-
7
-
8
-
9
-
10
-
11
-
12
-
13
-
14
-
15
-
16
-
17
-
18
-
19
-
20
-
21
-
22
-
23
-
24
-
25
-
26
-
27
-
28
-
29
-
30
-
31
-
32
-
33
-
34
-
35
-
36
-
37
-
38
-
39
-
40
-
41
-
42
-
43
-
44
-
45
-
46
-
47
-
48
-
49
-
50
-
51
-
52
-
53
-
54
-
55
-
56
-
57
-
58
-
59
-
60
-
 61
61 -
 62
62 -
 63
63 -
 64
64 -
 65
65 -
 66
66 -
 67
67 -
 68
68 -
 69
69 -
 70
70 -
 71
71 -
72
-
73
-
74
-
75
-
76
-
77
-
78
-
79
-
80
-
81
-
82
-
83
-
84
-
85
-
86
-
87
-
88
-
89
-
90
-
91
-
92
-
93
-
94
-
95
-
96
-
97
-
98
-
99
-
100
-
101
-
102
-
103
-
104
-
105
-
106
-
107
-
108
-
109
-
110
-
111
-
112
-
113
-
114
-
115
-
116
 |
 |

5
WHEELCHAIR OPERATION
Invacare® TDX® SC, Invacare TDX Spree
66
Part No 1149267
Removing
1.
Remove the socket heat screw, three washers, spacer and locknut
that secures the footboard to the footboard support.
2.
Remove the footboard from the footboard support.
Installing
1.
Position the footboard onto the footboard support so that the
mounting holes in the wheelchair frame align with the desired
mounting holes in the footboard support.
2.
Using the socket heat screw, three washers, spacer and locknut
secure the footboard to the footboard support.
FIGURE 17
Removing
±
WARNING
Pinch point may occur when rotating the
footboard assembly.
Footboard
Assembly
Locknut
Spacer
Washers
Socket Head Screw
Washer
Footboard Support