JVC DLA-M4000LU DLA-M4000LU User instruction manual (1.1MB) - Page 33
Operating the Main Menu Basic Operation of the Main Menu
 |
View all JVC DLA-M4000LU manuals
Add to My Manuals
Save this manual to your list of manuals |
Page 33 highlights
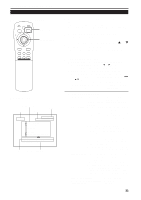
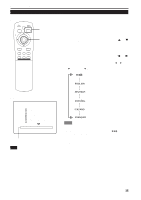
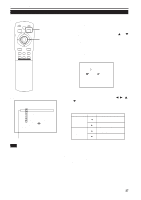
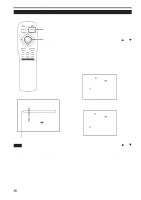
Operating the Main Menu (Cont.) Operating the Main Menu (Basic Operation of the Main Menu) s Remote control unit QUICK ALIGN. OPERATE AV HIDE PRESET PAGE BACK MENU/ PAGE BACK button ENTER LENS LOCK UNLOCK MENU/ENTER button AV RGB/COMPUTER U SHIFT D T ZOOM W LENS + FOCUS - s Main menu Submenu items Input line Source Channel YPBPR CH: 1 HDTV(1080i) PIXEL CLOCK POSITION PICTURE OPTIONS SOURCE CHANNEL USER SOURCE SET UP DISPLAY SIZE DECODER LANGUAGE NTSC(480i) ENGLISH Decoder (color system) Language For projector's menus, the setting menu and the main menu are available. Here, we explain about the operation of the main menu. For the setting menu, refer to "Making Basic Settings" on page 30. 1 Press the MENU/ENTER button. • The main menu is displayed on the screen. 2 Press MENU/ENTER toward the 5 or ∞ mark to select an item. • The selected item (displayed text) is shown in magenta color on the screen. 3 Set (adjust) the item. s When you have selected DECODER or LANGUAGE, • Press MENU/ENTER toward the 2 or 3 mark to set. * To finish the main menu, press the PAGE BACK button. s When you have selected an item on the submenu, • Press MENU/ENTER to display the submenu. Then, set (adjust) the item by pressing MENU/ENTER toward the 2/3 or 5/∞ mark. * To return to the main menu, press PAGE BACK again. To finish the main menu, press PAGE BACK again. (To finish the main menu from the submenu, press PAGE BACK twice.) s About main menu display: Line display: The selected input-mode designation is displayed. For input-mode designation, "Y/C", "VIDEO", "YPBPR", "RGB 1" and "RGB 2" are available. Source display: The type of signal being input is displayed. With this projector, unique designations are previously given to specific horizontal and vertical frequencies. This allows the source selected under SOURCE (submenu item) to be indicated. The source setting can be selected from AUTO mode, dedicated (forced) modes and USER mode. When AUTO is selected, the horizontal and vertical frequencies of a signal being input are detected and the matched designation is displayed in ( ). Therefore, be careful as the source display does not always correspond to the indication or type of the input signal. For the unique designations for the specific horizontal and vertical frequencies, see page 19. Channel display: The channel selected by the user is displayed. The line and sources selected by the user have been registered to the channel. Once registered, the line and sources of the projector will change to the ones the user has registered only by switching between channels. The settings should be made on the "Channel setup/selection menu". For details, see page 47. Submenu item display: See pages 36 to 58. Decoder (Color system) display: See page 34. Language display: See page 35. 33
-
 1
1 -
2
-
3
-
4
-
5
-
6
-
7
-
8
-
9
-
10
-
11
-
12
-
13
-
14
-
15
-
16
-
17
-
18
-
19
-
20
-
21
-
22
-
23
-
24
-
25
-
26
-
27
-
 28
28 -
 29
29 -
 30
30 -
 31
31 -
 32
32 -
 33
33 -
 34
34 -
 35
35 -
 36
36 -
 37
37 -
 38
38 -
39
-
40
-
41
-
42
-
43
-
44
-
45
-
46
-
47
-
48
-
49
-
50
-
51
-
52
-
53
-
54
-
55
-
56
-
57
-
58
-
59
-
60
-
61
-
62
-
63
-
64
-
65
-
66
-
67
-
68
 |
 |
