JVC DLA-M4000LU DLA-M4000LU User instruction manual (1.1MB) - Page 47
Setting Up Channels
 |
View all JVC DLA-M4000LU manuals
Add to My Manuals
Save this manual to your list of manuals |
Page 47 highlights
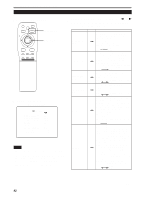
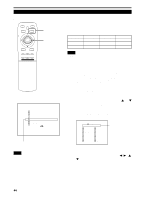
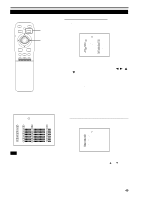
Operating the Main Menu (Cont.) Setting Up Channels s Remote control unit QUICK ALIGN. OPERATE AV HIDE PRESET PAGE BACK MENU/ PAGE BACK button MENU/ENTER button ENTER LENS LOCK UNLOCK AV RGB/COMPUTER U SHIFT D T ZOOM W LENS + FOCUS - When you set up channels, you can select a line and a multiple of sources (up to 30) for each channel. If you are using a switcher and set switcher numbers, you can also select each channel from the switcher side. Memo • With multiple sources having been set on channels, when a channel is selected, incoming signal is automatically checked and switched to one of the sources registered on the channel. If a matching source is not found among the registered sources, the most approximate source of the sources registered will be selected. 1 Press the MENU/ENTER button. • The main menu appears on the screen. 2 Press MENU/ENTER toward the 5 or ∞ mark to select a submenu item, "CHANNEL". • The selected item (text display) is shown in magenta color. 3 Press the MENU/ENTER button to set. • A submenu item, "CHANNEL setup/selection menu", appears on the screen. • If no "LINE", "SOURCE" or "SWNo" item is registered, unregistered characters (7) are displayed on the screen. sMain menu YPBPR CH: 1 HDTV(1080i) PIXEL CLOCK POSITION PICTURE OPTIONS SOURCE CHANNEL USER SOURCE SET UP DISPLAY SIZE DECODER LANGUAGE NTSC(480i) ENGLISH CHANNEL (AUTO) CH LINE SOURCE SW N o 1 Y/C NTSC(480i) 1 2 VIDEO PAL/SECAM 2 3 77777 777777777 77 4 77777 777777777 77 5 77777 777777777 77 6 77777 777777777 77 7 77777 777777777 77 8 77777 777777777 77 9 77777 777777777 77 10 77777 777777777 77 (CHANNEL setup menu) 4 Press MENU/ENTER toward the 5 or ∞ mark to select the channel (CH) whose contents you want to change. • The selected CH is shown in magenta color. Submenu item [CHANNEL] Notes • The selected item is shown in magenta color. Items shown in gray color cannot be operated or set in the current mode. • Items that can be set are different when video signals are input and when computer signals are input. • For dedicated source signals (corresponding frequency, etc.) for computer signals, see page 19. 5 Press MENU/ENTER toward the 2 or 3 mark to select the item to set (LINE, SOURCE or SWNo). • The selected item is shown in magenta color. • Unregistered channel items (LINE, SOURCE or SWNo) can also be selected. However, "LINE" and "SOURCE" need to be already set. 6 Press MENU/ENTER to set. • Channel items LINE, SOURCE and SWNo) for the "CH" selected on the "CHANNEL setup • selection" menu are set. • For how to set each item, see pages 48 to 51. 47
-
 1
1 -
2
-
3
-
4
-
5
-
6
-
7
-
8
-
9
-
10
-
11
-
12
-
13
-
14
-
15
-
16
-
17
-
18
-
19
-
20
-
21
-
22
-
23
-
24
-
25
-
26
-
27
-
28
-
29
-
30
-
31
-
32
-
33
-
34
-
35
-
36
-
37
-
38
-
39
-
40
-
41
-
 42
42 -
 43
43 -
 44
44 -
 45
45 -
 46
46 -
 47
47 -
 48
48 -
 49
49 -
 50
50 -
 51
51 -
 52
52 -
53
-
54
-
55
-
56
-
57
-
58
-
59
-
60
-
61
-
62
-
63
-
64
-
65
-
66
-
67
-
68
 |
 |