JVC GY-DV5000U DR-DV5000U DV Video Disk Recorder 44 page instruction manual - Page 38
Computer, File -> New -> Folder, File -> New Folder, Tools -> MediaTool, All Projects,
 |
View all JVC GY-DV5000U manuals
Add to My Manuals
Save this manual to your list of manuals |
Page 38 highlights
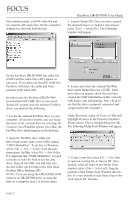
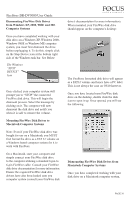
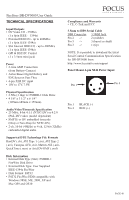
files simultaneously; an OMF video file and two separate AIF audio files. On the computer's desktop, the files will look like this... FireStore DR-DV5000 User Guide 3. Launch Xpress DV. Once you have opened the desired project or created a new project, select Tools -> MediaTool. The following window will appear: On the FireStore DR-DV5000, the video file (OMF) and the audio files (AIF) appear as one track. If you delete an Avid DV OMF file, FireStore will delete the audio and video portions at the same time. In order to use the FireStore DR-DV5000 recorded Avid DV OMF files on your Avid Xpress DV system from the external FireWire drive, you must do the following... 4. Locate and select the external FireWire drive under Media Drive(s). (NOTE: If the drive does not appear, check that you have created the OMFI MediaFiles folder correctly with proper case and spacing. Also, check to see that the drive is properly connected and recognized by the computer). 1. Locate the external FireWire drive on your computer. (If you have trouble, you can locate the name of the external drive by selecting My Computer on a Windows system. On a Mac, the FireWire drive should appear on the desktop). Under Project(s), select All Projects (This will highlight all items in the Project(s) window). Ensure Master Clips is checked then press OK. The following Media Tools Window will appear: 2. Open the FireWire drive when you have found it and create a new folder named "OMFI MediaFiles". To do this on Windows, select File -> New -> Folder from the pull down menu. On Mac, select File -> New Folder. It is important that "OMFI MediaFiles" is typed correctly in order for Avid to see the disk drive. Drag all the OMF and AIF files into the new folder (do not drag in the files titled Desktop DB or Desktop DF). NOTE: if you are using the ORGANIZE OMF function on DR-DV5000 prior to using the disk on a computer, step 2 is not necessary. 5. Create a new bin (select File -> New Bin) or open an existing bin in Xpress DV. Once opened, select all items in the Media Tools window (select Edit-> Select All). Drag the contents of the Media Tools Window into the bin. It is now possible to use these clips in the Avid Xpress DV timeline. PAGE 37
-
 1
1 -
2
-
3
-
4
-
5
-
6
-
7
-
8
-
9
-
10
-
11
-
12
-
13
-
14
-
15
-
16
-
17
-
18
-
19
-
20
-
21
-
22
-
23
-
24
-
25
-
26
-
27
-
28
-
29
-
30
-
31
-
32
-
 33
33 -
 34
34 -
 35
35 -
 36
36 -
 37
37 -
 38
38 -
 39
39 -
 40
40 -
 41
41 -
 42
42 -
 43
43 -
44
 |
 |
