JVC GY-HM700UXT JVC ProHD Clip Manager Owner's Manual (47 pg.) - Page 33
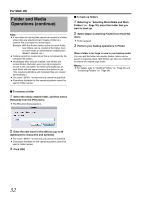
Deleting Folders, Splitting Folders
 |
View all JVC GY-HM700UXT manuals
Add to My Manuals
Save this manual to your list of manuals |
Page 33 highlights
Deleting Folders 1 Referring to ASelecting Work Media and Work FoldersB (A Page 30), select the folder to delete 2 Press the delete key with the Command key held down, or select [Delete] from the [Edit] menu Ⅵ Reasons why a folder deletion may fail Folder deletion operations may fail for the following reasons. In these cases, an error message appears and the folder is not deleted. ● You do not have delete/write privileges for the selected folder. ● The selected folder is write protected. ● Clips or other folders exist beneath the folder. T1 Note: ● Be careful when deleting folders, because all data in the folder is deleted. ● Deletions cannot be undone after they finish. T1 : The following shows two situations in which a folder cannot be deleted. ● When there is a file that is not linked to the object folder ● When there is another folder besides the object folder In these cases, the file which is not linked to the object folder and any other folder must be deleted beforehand. Splitting Folders You can split large folders into smaller folders. This allows you to back up all of the clips in a large folder to media that is not large enough to save the entire folder without splitting. For example, you can split an 8 GB folder into two 4 GB folders in order to save them on 4 GB DVD-R media. Note that individual files in the large folder are not split. 1 Referring to ASelecting Work Media and Work FoldersB (A Page 30), select the folder to split 2 Select [Split Folder] in the [Edit] menu, or click the Split Folder button ● The [Split Folder] dialog appears. Note: ● Note that individual files in the large folder are not split. Clips are assigned to the split folders in such a way that the split folders have the specified size. This means that it is not possible to specify a split folder size smaller than the largest file in the original folder. ● It is also not possible to specify a split folder size smaller than 4 GB. 3 Select the size of the split folders from the drop-down list 4 Click [Start] ● You can select from 4 GB to 60 GB in increments of 4 GB. ● The folder is split into the minimum number of folders that will produce the specified folder size, and clips are assigned to the smaller folders. The folders produced as a result of the split have the same name as the original folder, followed by serial numbers. Note: ● Once it starts, a split operation cannot be canceled before it finishes. ● Split clips may be assigned to different folders. If you would prefer that split clips be assigned to other folders, you can move them manually after the folder split. 33
-
 1
1 -
2
-
3
-
4
-
5
-
6
-
7
-
8
-
9
-
10
-
11
-
12
-
13
-
14
-
15
-
16
-
17
-
18
-
19
-
20
-
21
-
22
-
23
-
24
-
25
-
26
-
27
-
 28
28 -
 29
29 -
 30
30 -
 31
31 -
 32
32 -
 33
33 -
 34
34 -
 35
35 -
 36
36 -
 37
37 -
 38
38 -
39
-
40
-
41
-
42
-
43
-
44
-
45
-
46
-
47
 |
 |
